4.2 Supabase Email Authentication
Learning Objectives
- Create and configure a Supabase project for authentication
- Install the Supabase client SDK with secure storage integration
- Implement email/password registration and login flows
- Build an Auth Context to manage authentication state app-wide
- Handle auth state changes with real-time listeners
- Test authentication in the Supabase dashboard
What is Supabase?
Section titled “What is Supabase?”Supabase is a SaaS (software-as-a-service) platform that provides us with a cloud-based PostgreSQL database with a generous free tier: 50,000 monthly active users, 500MB database, and more. Supabase has many features including edge/serverless functions and realtime data, but we’re only going to use it for handling users. It’s a complete authentication service that handles password hashing, token generation, session management, and security best practices for us so we don’t spend time reinventing the wheel.1
Supabase Project Setup
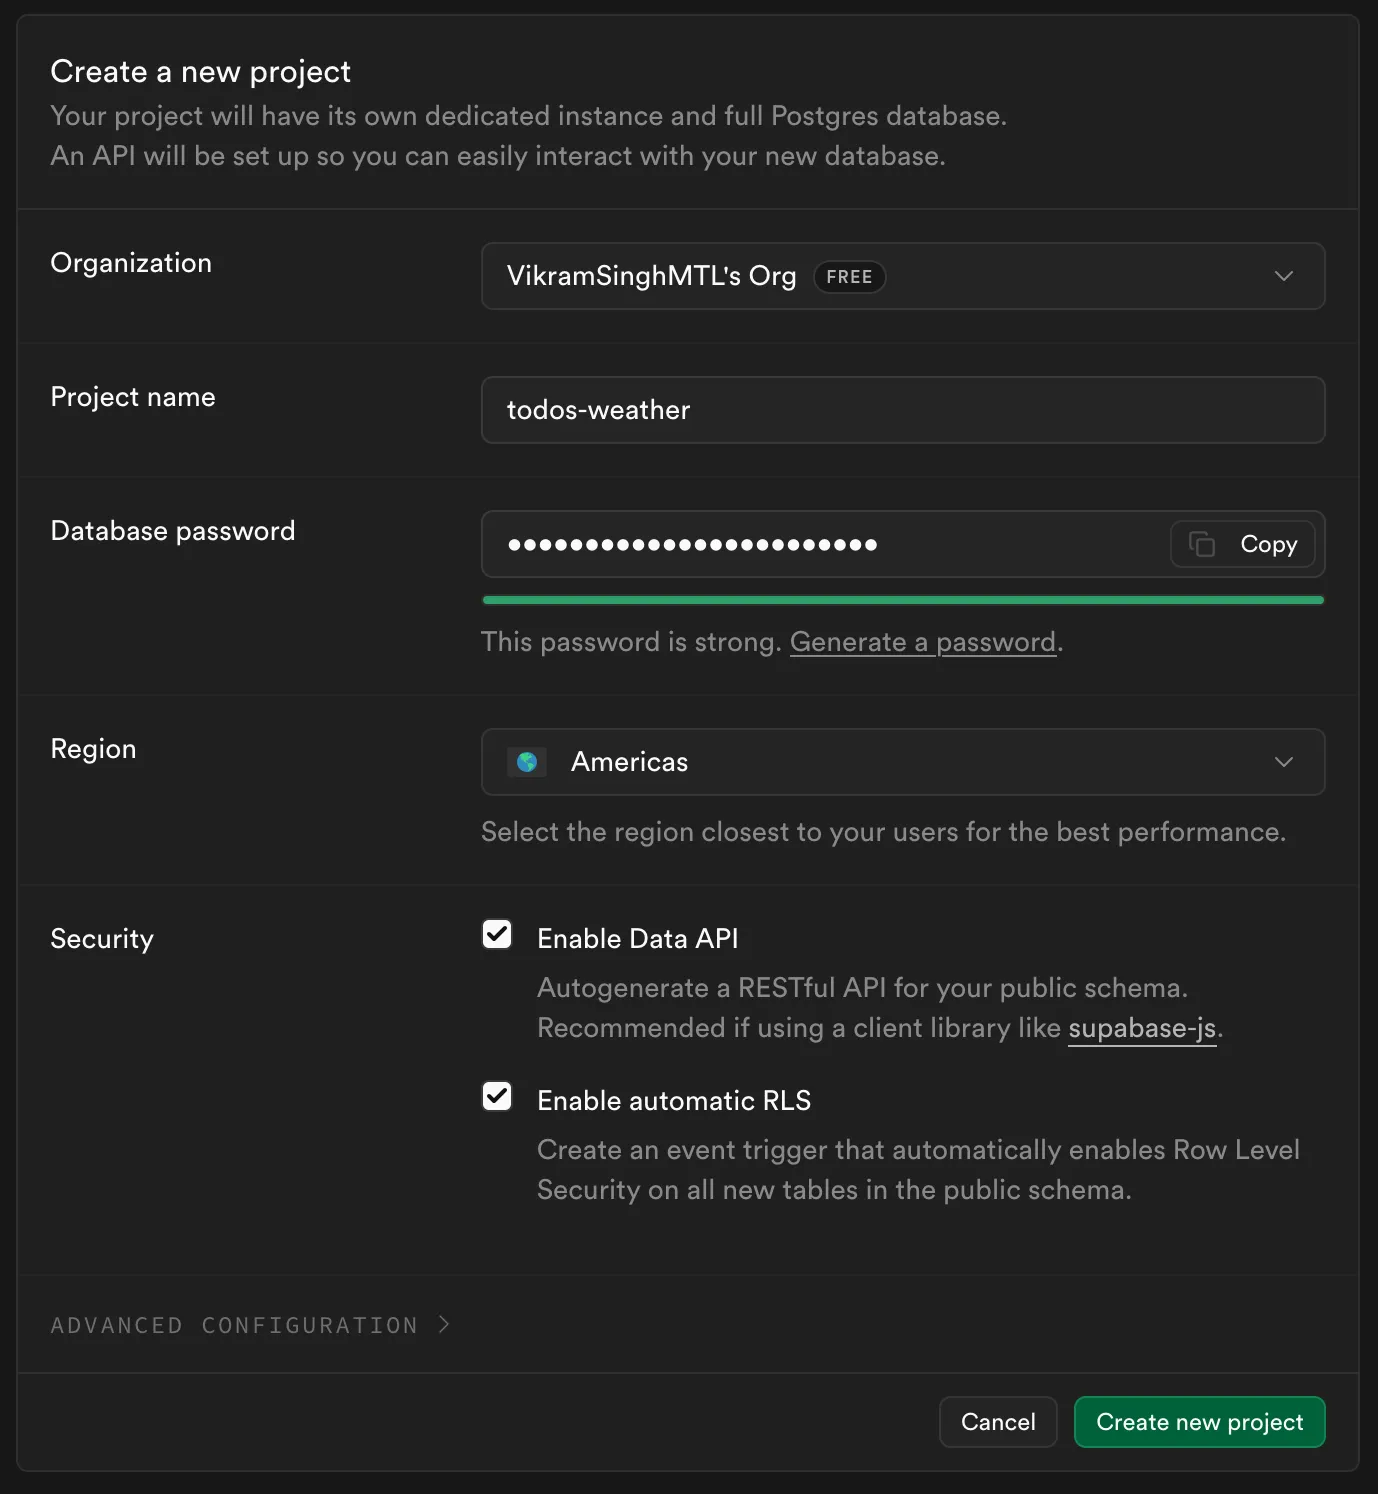
Section titled “Supabase Project Setup”Let’s create our first Supabase project.
-
Visit the Supabase dashboard and sign in with your GitHub account.
-
Click New Project and fill in:
-
Wait for initialization while Supabase provisions your database and auth server. This takes 1-2 minutes. You’ll see a loading screen.
-
Once ready, go to Integrations in the sidebar, then Data API, and copy the Project ID:
https://xxxxx.supabase.co. -
Go to Project Settings in the sidebar, then API Keys, and copy the Publishable key:
sb_publishable_.... -
Go to Authentication in the sidebar, then Sign In / Providers, and disable Confirm email.
You now have a Supabase project! Let’s connect it to your Expo app.2
Installing Dependencies
Section titled “Installing Dependencies”In your Expo app, install the following packages:
bun install @supabase/supabase-js @react-native-async-storage/async-storage@2.2.0 react-native-url-polyfillDeeper Dive: What Each Package Does
-
@supabase/supabase-jsis the official Supabase JavaScript client library. This provides all the functions you need to interact with Supabase services likesignUp(),signIn(),signOut(), and database queries. It handles communication with Supabase’s REST API and manages authentication tokens automatically. -
@react-native-async-storage/async-storageis a simple, asynchronous key-value storage system for React Native.3 Supabase requires this as a peer dependency for storing non-sensitive session metadata (like refresh times). -
react-native-url-polyfilladds full support for the JavaScriptURLAPI to React Native. Modern web browsers have built-in URL parsing capabilities, but React Native’s JavaScript environment doesn’t include this by default. Supabase’s client library uses URL parsing internally for things like constructing API endpoints and parsing OAuth redirect URLs, so we need this polyfill to make it work.
:::
Environment Variables
Section titled “Environment Variables”Create a .env file at your project root if you don’t have one already, and replace the values with your credentials copied earlier from the Supabase Dashboard.
EXPO_PUBLIC_SUPABASE_URL=https://xxxxxx.supabase.coEXPO_PUBLIC_SUPABASE_KEY=sb_publishable_your_key_hereSupabase Client Configuration
Section titled “Supabase Client Configuration”Create a new file to initialize the Supabase client:
import 'react-native-url-polyfill/auto';import AsyncStorage from '@react-native-async-storage/async-storage';import { createClient } from '@supabase/supabase-js';
const supabaseUrl = process.env.EXPO_PUBLIC_SUPABASE_URL!;const supabasePublishableKey = process.env.EXPO_PUBLIC_SUPABASE_KEY!;
export const supabase = createClient(supabaseUrl, supabasePublishableKey, { auth: { storage: AsyncStorage, autoRefreshToken: true, persistSession: true, detectSessionInUrl: false, },});Auth Context Setup
Section titled “Auth Context Setup”Now let’s create a React Context to manage authentication state throughout the app.
import React, { createContext, useContext, useEffect, useState } from 'react';import { Session, User } from '@supabase/supabase-js';import { supabase } from '../lib/supabase';
interface AuthContextType {7 collapsed lines
user: User | null; session: Session | null; isLoading: boolean; isLoggedIn: boolean; signUp: (email: string, password: string) => Promise<{ error?: string }>; signIn: (email: string, password: string) => Promise<{ error?: string }>; signOut: () => Promise<void>;}
const AuthContext = createContext<AuthContextType | undefined>(undefined);
export function AuthProvider({ children }: { children: React.ReactNode }) {59 collapsed lines
const [user, setUser] = useState<User | null>(null); const [session, setSession] = useState<Session | null>(null); const [isLoading, setIsLoading] = useState(true);
// Initialize session on mount useEffect(() => { supabase.auth.getSession().then(({ data: { session } }) => { setSession(session); setUser(session?.user ?? null); setIsLoading(false); }); }, []);
// Listen for auth state changes useEffect(() => { const { data: { subscription }, } = supabase.auth.onAuthStateChange((_event, session) => { setSession(session); setUser(session?.user ?? null); });
return () => subscription.unsubscribe(); }, []);
const signUp = async (email: string, password: string) => { const { error } = await supabase.auth.signUp({ email, password });
return error ? { error: error.message } : {}; };
const signIn = async (email: string, password: string) => { const { error } = await supabase.auth.signInWithPassword({ email, password, });
return error ? { error: error.message } : {}; };
const signOut = async () => { await supabase.auth.signOut(); };
return ( <AuthContext.Provider value={{ user, session, isLoading, isLoggedIn: !!user, signUp, signIn, signOut, }} > {children} </AuthContext.Provider> );}
export function useAuth() { const context = useContext(AuthContext);
if (context === undefined) { throw new Error('useAuth must be used within an AuthProvider'); }
return context;}-
State management:
user: Current user object (or null if logged out)session: Current session (contains tokens)isLoading: True while checking for existing session on app start
-
Session initialization (first
useEffect):- Runs once when app opens
- Checks secure storage for existing session
- Restores user if valid session found
- Sets
isLoadingto false when done
-
Auth state listener (second
useEffect):- Listens for auth events (login, logout, token refresh)
- Automatically updates
userandsessionstate - Unsubscribes on cleanup to prevent memory leaks
-
Auth functions:
signUp: Creates new user accountsignIn: Logs in existing usersignOut: Logs out and clears tokens- All return error messages if something goes wrong
File Structure with Expo Router
Section titled “File Structure with Expo Router”Set up your file structure to support auth flow with route groups:
Directoryapp/
- _layout.tsx Root layout with AuthProvider
Directory(auth)/ Public routes (logged out)
- _layout.tsx
- login.tsx
- register.tsx
Directory(tabs)/ Protected routes (logged in) containing your existing tabs/screens
- …
Directorylib/
- supabase.ts Supabase client
Directorycontexts/
- AuthContext.tsx Auth state management
Root Layout with Auth Flow
Section titled “Root Layout with Auth Flow”The root layout checks auth state and renders the appropriate route group using Expo Router’s built-in protection:4
import { Tabs } from 'expo-router';import { AuthProvider, useAuth } from '../contexts/AuthContext';
export default function RootLayoutNav() { const { isLoggedIn } = useAuth();
return ( <Tabs>13 collapsed lines
{/* Public tab - always visible */} <Tabs.Screen name="weather" options={{ title: 'Weather' }} />
{/* Protected tabs - only visible when logged in */} <Tabs.Protected guard={isLoggedIn}> <Tabs.Screen name="todos" options={{ title: 'Todos' }} /> <Tabs.Screen name="profile" options={{ title: 'Profile' }} /> </Tabs.Protected>
{/* Login tab - only visible when logged out */} <Tabs.Protected guard={!isLoggedIn}> <Tabs.Screen name="login" options={{ title: 'Login' }} /> </Tabs.Protected> </Tabs> );}
export default function RootLayout() { return ( <AuthProvider> <RootLayoutNav /> </AuthProvider> );}Login Screen
Section titled “Login Screen”Create the login screen with email/password inputs:
import { useState } from 'react';import { Link } from 'expo-router';import { useAuth } from '../../contexts/AuthContext';
export default function LoginScreen() { const [email, setEmail] = useState(''); const [password, setPassword] = useState(''); const [loading, setLoading] = useState(false); const { signIn } = useAuth();
const handleLogin = async () => {12 collapsed lines
if (!email || !password) { // Show appropriate error message. return; }
setLoading(true); const { error } = await signIn(email, password); setLoading(false);
if (error) { // Show appropriate error message. } };
return ( <View>26 collapsed lines
<Text>Login</Text>
<TextInput placeholder="Email" value={email} onChangeText={setEmail} autoCapitalize="none" keyboardType="email-address" />
<TextInput placeholder="Password" value={password} onChangeText={setPassword} secureTextEntry />
<Button title={loading ? 'Loading...' : 'Login'} onPress={handleLogin} disabled={loading} />
<Link href="/(auth)/register"> <Text>Don't have an account? Register</Text> </Link> </View> );}Notice we don’t manually call router.push() upon successful login. Expo Router handles navigation when the guard conditions change.
signIn()callssupabase.auth.signInWithPassword()in the AuthContext- Supabase validates credentials and returns a session with JWT tokens
- The tokens are automatically saved to AsyncStorage (thanks to our config)
- The
onAuthStateChangelistener fires immediately - AuthContext updates
sessionanduserstate - The
isLoggedInvalue becomestrue - Expo Router evaluates the
Tabs.Protectedguards in the root layout - The
(auth)routes become inaccessible,(tabs)routes become accessible - The app automatically navigates to the protected home screen
Register Screen
Section titled “Register Screen”The register screen is almost identical to login, but calls signUp:
import { useState } from 'react';import { View, Text, TextInput, Button, Alert } from 'react-native';import { Link } from 'expo-router';import { useAuth } from '../../contexts/AuthContext';
export default function RegisterScreen() { const [email, setEmail] = useState(''); const [password, setPassword] = useState(''); const [confirmPassword, setConfirmPassword] = useState(''); const [loading, setLoading] = useState(false); const { signUp } = useAuth();
const handleRegister = async () => {22 collapsed lines
if (!email || !password || !confirmPassword) { // Show appropriate error message. return; }
if (password !== confirmPassword) { // Show appropriate error message. return; }
if (/* Password validation conditions */) { // Show appropriate error message. return; }
setLoading(true); const { error } = await signUp(email, password); setLoading(false);
if (error) { // Show appropriate error message. } };
return ( <View>37 collapsed lines
<Text>Register</Text>
<TextInput placeholder="Email" value={email} onChangeText={setEmail} autoCapitalize="none" keyboardType="email-address" editable={!loading} />
<TextInput placeholder="Password (min 6 characters)" value={password} onChangeText={setPassword} secureTextEntry editable={!loading} />
<TextInput style={styles.input} placeholder="Confirm Password" value={confirmPassword} onChangeText={setConfirmPassword} secureTextEntry editable={!loading} />
<Button title={loading ? 'Loading...' : 'Register'} onPress={handleRegister} disabled={loading} />
<Link href="/(auth)/login"> <Text>Already have an account? Login</Text> </Link> </View> );}Home Screen (Protected)
Section titled “Home Screen (Protected)”Finally, the protected home screen, or whatever you want your first screen to be. This is just an example that shows how you would access user properties and log the user out.
import { View, Text, Button } from 'react-native';import { useAuth } from '../../contexts/AuthContext';
export default function HomeScreen() { const { user, signOut } = useAuth();
return ( <View> <Text>Welcome!</Text> <Text>You are logged in</Text>
<View> <Text>Email: {user?.email}</Text> <Text>User ID: {user?.id}</Text> </View>
<Button title="Logout" onPress={signOut} /> </View> );}Testing Your Authentication System
Section titled “Testing Your Authentication System”-
Run your app:
Terminal window bun run start# Press 'i' for iOS or 'a' for Android -
Register a new account:
- Should see the register screen first (no user logged in)
- Enter email and password (min 6 characters)
- Tap “Register”
-
Check Supabase Dashboard:
- Go to your Supabase project
- Navigate to Authentication → Users
- You should see your newly registered user!
-
Test login:
- Close and reopen your app
- Should automatically log you in (session persists!)
- If you logout, you’ll see the login screen
-
Test logout:
- Tap “Logout” from the home screen
- Should return to login screen
- Session cleared from secure storage
-
Test wrong password:
- Try logging in with incorrect password
- Should see error alert
How Session Persistence Works
Section titled “How Session Persistence Works”When you close and reopen the app:
AuthContextruns initialuseEffect- Calls
supabase.auth.getSession() - Supabase SDK checks
AsyncStoragefor saved tokens - If valid tokens found → restores session
- If no tokens or expired → returns null
- UI renders based on result (login screen vs home screen)
Deeper Dive: Supabase's 'Session' Terminology
Supabase uses token-based authentication with JWTs, but they call the auth state a Session.
Example of a Supabase Session object:
{ access_token: "eyJhbGciOiJIUzI1NiIsInR5cCI6IkpXVCJ9...", refresh_token: "xYz123AbC456...", expires_at: 1678903600, expires_in: 3600, user: { id: "550e8400-e29b-41d4-a716-446655440000", email: "alice@example.com", created_at: "2024-03-15T10:30:00Z" }}When you see session.access_token, that’s the JWT being sent with every API request.
In Assignment 4, you’ll add this auth system to your existing app and make all data user-scoped!