Assignment 1
Learning Objectives
- Choose an app concept that excites you and can grow across multiple assignments
- Plan your app’s structure with component decomposition
- Design your data model with TypeScript interfaces
- Sketch your UI with list and card view layouts
- Implement FlatList to display collections of data
- Build interactive filter and sort functionality using state
- Create reusable components with proper TypeScript typing
- Apply StyleSheet for consistent and polished UI design
🔍 Context
Section titled “🔍 Context”You’ll build a mobile app that manages a list of items that focuses on the R of CRUD operations (Create, Read, Update, Delete).
Your app will:
- Display a collection of items in a list view
- Display a collection of items in a card view
- Filter items by different criteria
- Sort items by different criteria
- Display images/icons for visual interest in a way that is appropriate for your app concept
App Examples
Section titled “App Examples”Choose any theme you’re passionate about:
Task manager: Tasks with priority levels- This one has been done to death, and I’ll use it for examples, so no one is allowed to do it!
- Shopping list: Grocery items with categories
- Reading list: Books with reading status
- Contact manager: People with tags or groups
- Bookmark app: Links with categories
- Recipe collection: Recipes with difficulty ratings
- Movie watchlist: Movies with your ratings
- Game inventory: Games with genre/platform
- Workout tracker: Exercises with sets/reps
- Travel bucket list: Destinations with visited status
- Podcast tracker: Episodes with listening status
- Plant care log: Plants with watering schedules
- Habit tracker: Habits with completion streaks
Pick an idea you can carry through all 4-5 assignments and keep expanding. That means your app concept should be able to support:
- Read data shown in a list ← This assignment
- Multiple screens to navigate between + CRUD ← Assignment 2
- A map view ← Assignment 2
- Data fetched from an external API ← Assignment 3
- Users and user-specific data ← Assignment 4
- A real-time feature (e.g., chat, live updates, shared editing) ← Assignment 5
Examples of long-term app ideas:
- Food truck finder: List nearby trucks (map), fetch reviews (API), favorite trucks (users), live location updates (real-time)
- Hiking trail tracker: List trails (CRUD), show on map, fetch weather (API), user reviews, live trail conditions (real-time)
- Study group organizer: List study sessions, meeting locations (map), shared resources (API), user profiles, live chat (real-time)
Optional: Use GenAI to Brainstorm Ideas
Section titled “Optional: Use GenAI to Brainstorm Ideas”You can ask a GenAI assistant to suggest app ideas based on your interests. Copy this prompt and fill in your details:
Prompt you can use:
I'm a student building a React Native app across 4-5 assignments. I need a single app idea that can evolve over time. The app must support:
- CRUD data shown in a list view and card view- Multiple screens to navigate between- A map view that shows location-based data- Fetching data from an external API- Users and user-specific data- A real-time feature (chat or live updates)
My interests/hobbies/shows/games include:- [List 5-10 things you like]
Based on those interests, propose 5 app ideas. For each idea, explain briefly how it could satisfy each of the requirements above.If you don’t want to pursue a long-term app idea, you can choose from the simple examples listed above.
📐 Part 1: Planning & Design
Section titled “📐 Part 1: Planning & Design”Before writing any code, plan your app’s structure and appearance. This is what you should focus on this week.
1. Choose Your App Concept
Section titled “1. Choose Your App Concept”Write a 1-2 sentence description:
- What is your app?
- Who would use it?
- What problem does it solve?
Example: “A book tracker app for avid readers to manage their reading list. Users can filter books by ‘to read,’ ‘reading,’ or ‘finished,’ and sort by title or author.”
2. Define Your Data Model
Section titled “2. Define Your Data Model”What properties will each item have? Create a TypeScript interface.
Example for a book tracker:
interface Book { id: string; // Unique identifier title: string; // Book title author: string; // Author name status: 'to-read' | 'reading' | 'finished'; // Reading status genre: string; // Book genre coverUrl?: string; // Optional cover image}What will your interface look like? Write it down!
3. Sketch Your UI
Section titled “3. Sketch Your UI”Draw two layouts representing a list view and a card view. These can be photos of your hand-drawn sketches or links to digital designs like Figma or Excalidraw.
List View (compact):
- What’s the minimum info to show? (e.g., title + status icon)
- How will items be arranged? (rows, columns?)
- What actions are visible? (delete button? checkbox?)
Card View (expanded):
- What additional details will you show?
- What sorts of images will you include?
- How will cards be styled? (shadows, borders, colors?)
Example sketch:

Be sure to include buttons for filtering and sorting the list.
4. Plan Your Components
Section titled “4. Plan Your Components”What components will you need for your app? Break your app into reusable components.
Example components:
ItemCard: Displays one item of the collection in card viewItemList: Displays the collection in list viewListView: Container for list layoutCardView: Container for card layoutViewToggle: Button to switch between list/card viewFilterButtons: Buttons to filter by some item propertySortButtons: Buttons to sort by some item property
5. Plan Your Filter/Sort Criteria
Section titled “5. Plan Your Filter/Sort Criteria”What filter and sort options make sense for your app?
Example filters:
- Task manager: All / Active / Completed
- Shopping list: All / Bought / Needed
- Recipe app: All / Easy / Medium / Hard
- Movie watchlist: All / Watched / To Watch
Example sorts:
- Alphabetically (A-Z, Z-A)
- By date added (newest/oldest)
- By priority/rating
What to Submit
Section titled “What to Submit”Create a planning document that is the README.md of your repo with:
- App Concept (1-2 sentences)
- TypeScript Interface (your data model)
- UI Sketches (can be photos of your hand-drawn sketches or links to digital designs like Figma or Excalidraw)
- Component list (what components you’ll create and their responsibilities)
- Filter options (what subset of the data you want users to be able to view)
- Sort options (how users can order the list)
- (Optional) GenAI Chat Log (if you used AI to brainstorm, include the link)
Submit to by adding your README.md to your GitHub repo and notifying me by Teams.
🛠️ Part 2: Implementation
Section titled “🛠️ Part 2: Implementation”- Fork the starter repository from GitHub Classroom (link provided on Moodle). If you encounter errors while forking the starter repository, check your email and accept the GitHub invitation.
- Clone your forked repository to your local machine.
- Navigate to the project directory:
cd assignment-1 - Run
bun create expo --template blank-typescript .inside the repo folder. Ensure you include the period (.) to target the current directory. If it gives you an error about the directory not being empty, just move yourREADME.mdout of the way temporarily, run the command, then move it back. - Open the folder in VS Code. Run
bun run start, then pressafor the Android emulator orifor iOS. I highly recommend using the lab computers so that you can test both platforms simultaneously. Your submission must run on both platforms. - Create a
components/folder to organize your components. - Create a
.devlog.mdfile in the root of your project for your design diary (see Dev Log section below). - Start editing
App.tsxto build your app according to your plan!
You should have a file structure that looks something like this:
- .devlog.md (Your design diary for this assignment)
- app.json
- App.tsx (Start writing your code here)
Directoryassets/
- …
- bun.lock
Directorycomponents/ (Create this folder for your components)
- …
- index.ts
- package.json
- tsconfig.json
Third Party Libraries
Section titled “Third Party Libraries”If you need functionality beyond what React Native provides (e.g., icons, animations, gestures), you may install third-party libraries. However, you must follow this process:
-
Check Expo’s official packages first - Search docs.expo.dev to see if Expo has an official package for what you need (e.g.,
@expo/vector-icons,expo-image-picker,expo-linear-gradient). Always prefer Expo packages when available. -
If no Expo package exists, search the React Native Directory for community libraries.
-
Verify compatibility. The library must have ALL of these tags on React Native Directory:
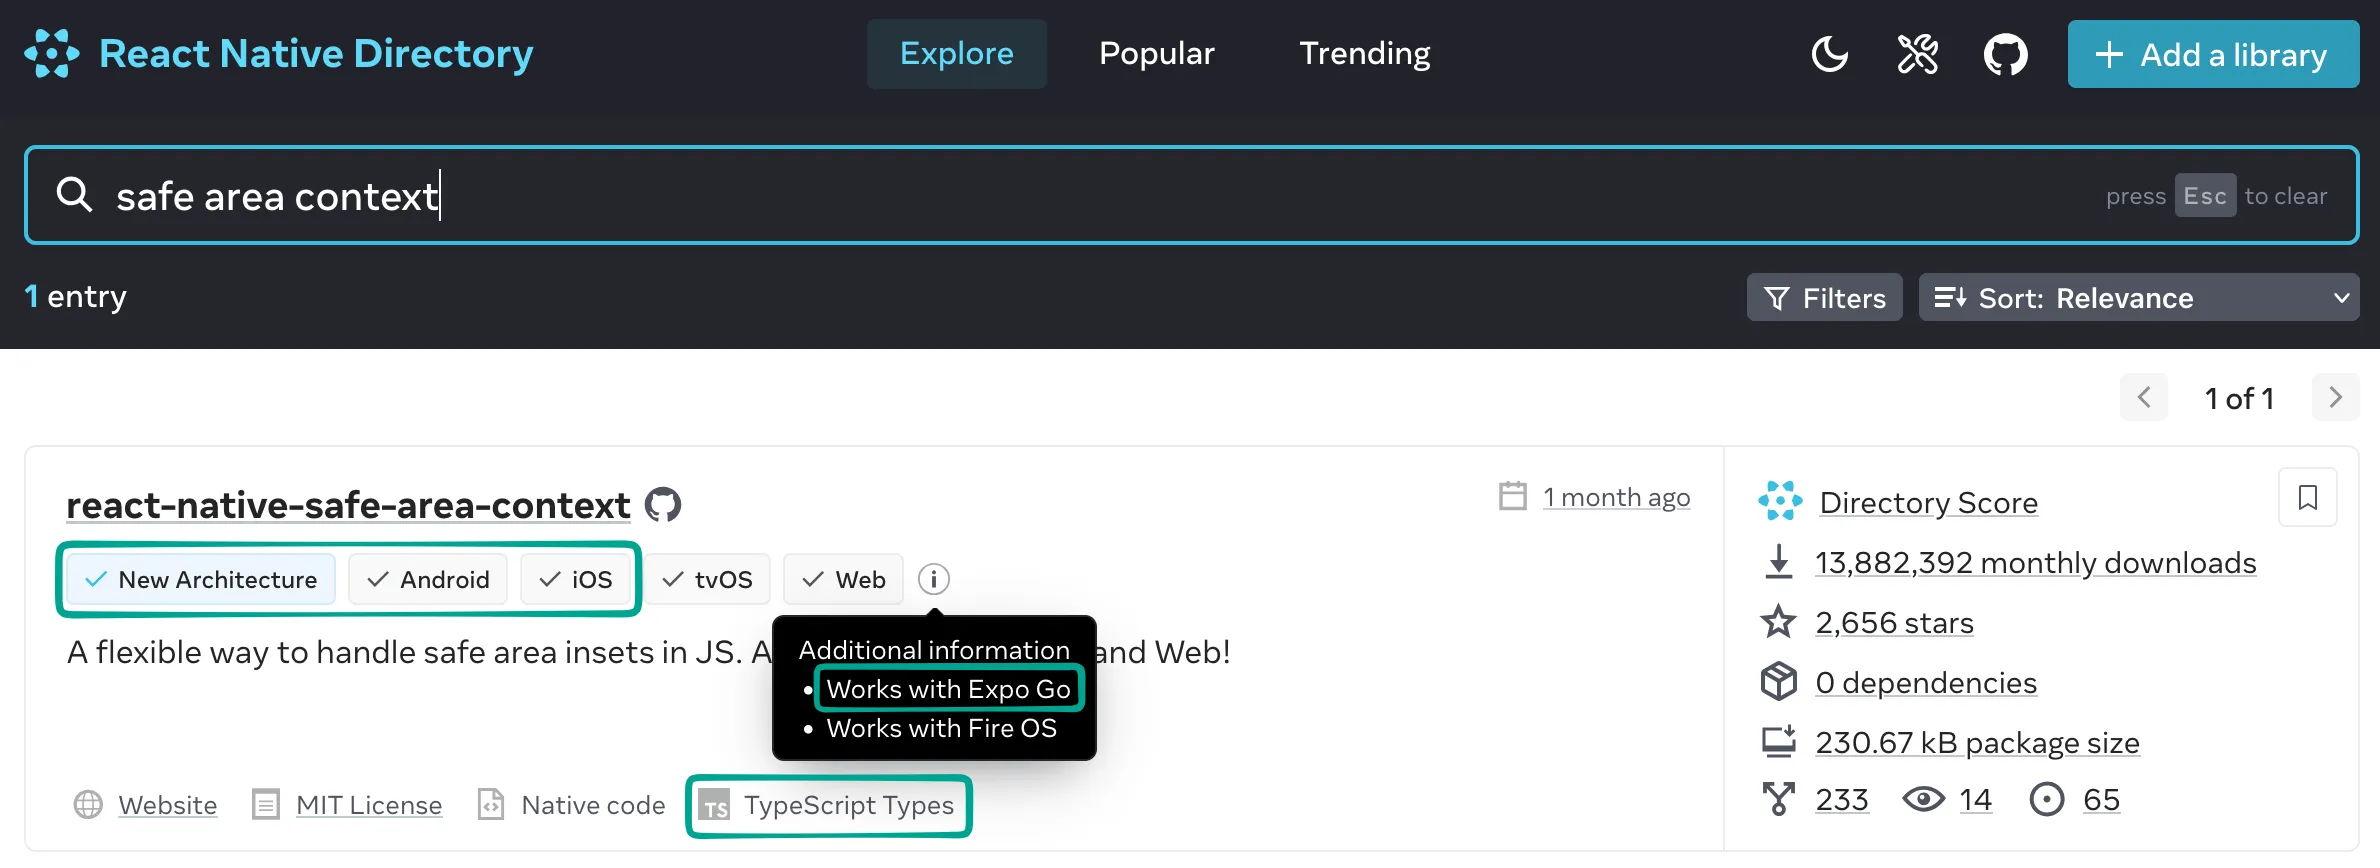
- ✅ New Architecture
- ✅ iOS
- ✅ Android
- ✅ Works with Expo Go
-
Use
bunto install the library. You can replace anynpmcommand withbun, e.g.,npm install react-native-gesture-handlerbecomesbun add react-native-gesture-handler. You can also replace anynpxcommand withbunx.
Data Structure (3 points)
Section titled “Data Structure (3 points)”Your list items must have proper data modeling and type safety.
Requirements:
- Each item must have at least 5 properties
- Define a TypeScript interface for your item type
- Use
useStatehook to manage the list of items - Each item should have a unique
id - Interface must use appropriate TypeScript types (no
any) - State array must be properly typed
| Criteria | Excellent (3) | Good (2) | Needs Improvement (1) | Incomplete (0) |
|---|---|---|---|---|
| Data Structure | Interface defined with ≥5 properly typed properties including unique id, used in properly typed useState array, no any types | Interface has 5 properties but missing id OR using any types OR state not properly typed | Interface has 3-4 properties OR has id but significant type issues | No interface defined OR <3 properties OR no state management |
View Modes (5 points)
Section titled “View Modes (5 points)”Your app must support both list view and card view with a toggle button to switch between them.
- List view should be compact and show key info only (like contacts or text messages).
- Card view should be expanded and show more details with images/icons (like Pinterest, Instagram, or YouTube thumbnails).
- Toggle button should provide a clear UI control to switch between views.
List View (2 points)
Section titled “List View (2 points)”List view must display items in a compact format showing only essential information.
Requirements:
- Uses the
<FlatList>component - Shows minimum 2-3 key properties per item
- Compact layout (items take less vertical space)
- All items render correctly
- Scrollable when list exceeds screen height
| Criteria | Excellent (2) | Partial (1) | Incomplete (0) |
|---|---|---|---|
| List View | FlatList displays all items with 2-3 key properties in compact layout, fully scrollable on both platforms | FlatList present but missing properties OR layout issues OR scrolling problems OR only works on one platform | No FlatList OR items don’t render |
Card View (2 points)
Section titled “Card View (2 points)”Card view must display items in an expanded format with more detail and visual elements.
Requirements:
- Uses the
<FlatList>component - Shows 4-5 properties per item (more than list view)
- Expanded layout with more spacing
- Includes visual elements (borders, shadows, or background colors)
- All items render correctly
- Scrollable when cards exceed screen height (use
<ScrollView>)
| Criteria | Excellent (2) | Partial (1) | Incomplete (0) |
|---|---|---|---|
| Card View | FlatList displays all items with 4-5 properties in card layout with visual styling (borders/shadows), fully scrollable on both platforms | FlatList present but only shows 2-3 properties OR missing visual styling OR scrolling problems OR only works on one platform | No card view OR items don’t render |
Toggle Button (1 point)
Section titled “Toggle Button (1 point)”A button or control that switches between list and card views.
Requirements:
- Button/control is clearly visible
- Changes view mode when pressed
- State updates correctly
- Both views are accessible
| Criteria | Complete (1) | Incomplete (0) |
|---|---|---|
| Toggle Button | Toggle button/control present and successfully switches between both views on both platforms | No toggle OR toggle doesn’t work OR can only access one view OR only works on one platform |
Filter (2 points)
Section titled “Filter (2 points)”Your app must allow users to filter the displayed items based on at least one property.
Requirements:
- At least 1 filter criteria implemented (e.g., status, category, priority)
- Filter buttons/controls are visible and clearly labeled
- Clicking a filter shows only matching items
- Must include an “All” or “Clear Filter” option to return to unfiltered view
- Filter works correctly with the data
- Filter works in both list and card views
| Criteria | Excellent (2) | Partial (1) | Incomplete (0) |
|---|---|---|---|
| Filter | ≥1 filter criteria with clear UI controls, correctly filters data, includes “All”/clear option, works in both views and both platforms | Filter present but missing “All” option OR only works in one view OR unclear UI OR only works on one platform | No filter implemented OR doesn’t actually filter the data |
Sort (2 points)
Section titled “Sort (2 points)”Your app must allow users to sort the displayed items based on at least one property.
Requirements:
- At least 1 sort criteria implemented (e.g., alphabetical, by date, by rating)
- Sort buttons/controls are visible and clearly labeled
- Clicking a sort reorders the items accordingly
- Must include a “Default” or “Clear Sort” option to return to original/unsorted order
- Sort works correctly (ascending/descending as appropriate)
- Sort works in both list and card views
- Sort should work together with filters (sorted results should remain filtered)
| Criteria | Excellent (2) | Partial (1) | Incomplete (0) |
|---|---|---|---|
| Sort | ≥1 sort criteria with clear UI controls, correctly sorts data, includes “Default”/clear option, works in both views and with filters on both platforms | Sort present but missing “Default” option OR only works in one view OR doesn’t work with filters OR unclear UI OR only works on one platform | No sort implemented OR doesn’t actually reorder the data |
Images (2 points)
Section titled “Images (2 points)”Your card view items must display images or icons that are appropriate for your app concept.
Requirements:
- At least 1 image/icon per item (can be static or dynamic)
- Images are relevant to the app concept
- Images are properly sized (not distorted or too large/small)
- Images load without errors
- Uses React Native
Imagecomponent with proper source
| Criteria | Excellent (2) | Partial (1) | Incomplete (0) |
|---|---|---|---|
| Images | Every card item has relevant image/icon, properly sized, no distortion, displays correctly in both views and both platforms | Images present but some sizing issues OR not all items have images OR display issues in one view OR only works on one platform | No images/icons OR images don’t load OR severely distorted |
UI/Layout (3 points)
Section titled “UI/Layout (3 points)”Your app should look polished and be pleasant to use.
Requirements:
- Organized component structure (separate files for components)
- Consistent styling using
StyleSheet - Proper spacing and padding
- Cards or list items have borders/shadows
- Readable font sizes
- Color scheme is consistent throughout the app
- Responsive to different screen sizes
- Buttons are easily tappable
- No overlapping elements
<SafeAreaView>used to avoid notches/status bar
| Criteria | Excellent (3) | Good (2) | Needs Improvement (1) | Incomplete (0) |
|---|---|---|---|---|
| UI/Layout | Components in separate files, consistent StyleSheet throughout, proper spacing/padding, visual polish (borders/shadows), readable fonts, consistent colors, buttons, SafeAreaView used | Most requirements met but missing 1-2 items: inconsistent styling OR small buttons OR no SafeAreaView OR minimal spacing | Missing 3-4 requirements: inline styles OR inconsistent colors OR readability issues OR components not separated | Minimal styling effort, no component organization, difficult to use |
Code Quality (3 points)
Section titled “Code Quality (3 points)”Your code should be clean, readable, and follow best practices.
Requirements:
- All TypeScript types defined (no
anytypes) - Meaningful variable and function names (not
x,temp,thing) - Comments explaining complex logic
- No console errors or warnings (check terminal/console)
- No unused imports or variables
- Consistent code formatting (indentation, spacing)
- Components are modular and reusable
- Proper file naming conventions (PascalCase for components)
| Criteria | Excellent (3) | Good (2) | Needs Improvement (1) | Incomplete (0) |
|---|---|---|---|---|
| Code Quality | All types defined (no any), meaningful names throughout, helpful comments, zero console errors/warnings, no unused code, consistent formatting, modular components | Minor issues: 1-2 warnings OR occasional unclear names OR some unused imports OR minor formatting inconsistencies | Multiple issues: some any types OR many unclear names OR 3-5 console warnings OR inconsistent formatting | Major issues: extensive any usage OR cryptic variable names OR console errors OR no code organization |
📝 Dev Log (5%)
Section titled “📝 Dev Log (5%)”Create a .devlog.md file in the project root. This file is your design diary. It’s where you document how you approached the assignment, what decisions you made, what challenges you encountered, and how you worked through them, including how you used any AI tools.
This is not a summary of your final product (that’s what your code and commit messages show). Instead, it’s a reflection of your process and thinking.
What to write:
- What approach you chose and why
- Any bugs or roadblocks you encountered and how you solved them
- How you tested and verified your implementation
- If you used AI tools (e.g. ChatGPT, Claude, Copilot), describe:
- What you asked
- What it returned
- What you kept or changed
- Include links to relevant chat logs when possible
What makes a good devlog:
- Specific technical insights (e.g. “I struggled with connecting the AI paddle’s movement to the ball’s position. I solved this by…”)
- Honest reflection on what you understood and what confused you
- Commentary on any AI output you received, what was useful, what wasn’t
What makes a weak devlog:
- Restating the assignment prompt
- Only describing what the final code does, without process
- Hiding or omitting AI tool usage
- Generic statements with no technical substance
Be concise. Bullet points are fine.
| Criteria | Standard |
|---|---|
| Process Reflection | Clear explanation of approach, design decisions, and problem-solving steps |
| Technical Detail | Specifics about code structure, logic, or bugs encountered and fixed |
| AI Usage Disclosure | Clearly explains how AI was used, what was kept/changed, with reasoning |
| Insight & Critical Thinking | Thoughtful reflection on what was learned, understood, or found challenging |
| Clarity & Format | Concise, readable, well-structured with bullet points or short paragraphs |
🤖 AI Involvement Category
Section titled “🤖 AI Involvement Category”At the top of your .devlog.md, you must declare your AI involvement category by selecting the option that best describes how you used AI during the assignment:
| Category | Description |
|---|---|
| No Use | You did not use any AI tools at any point. |
| Tutor | You used AI to explain code, concepts, or errors. No code was generated by AI. |
| Assistant | You asked AI for code suggestions or snippets and integrated them with understanding. |
| Reviewer | You wrote the code yourself, then used AI to review, critique, or suggest improvements. |
💬 Self & Peer Assessment (5%)
Section titled “💬 Self & Peer Assessment (5%)”You’ll use the Moodle Workshop feature to assess your own work and give feedback on 2 of your peers’ submissions. Assessment is a core developer skill. Reading others’ code, giving constructive feedback, and critically evaluating your own work are things you’ll do constantly in real software teams.
Self-Assessment
Section titled “Self-Assessment”Before assessing your peers, you must grade your own submission using the same rubric. This helps you:
- Reflect on your work objectively
- Identify areas you could improve
- Practice evaluating code against clear criteria
- Develop self-awareness about your coding skills
Be honest in your self-assessment. The grade you give yourself is compared to the grade given by your peers and will negatively affect your final grade if there is a large discrepancy, and the thoughtfulness of your reflection will be considered.
Peer Assessment
Section titled “Peer Assessment”After completing your self-assessment, you’ll assess 2 of your peers’ submissions. Your assessment grade depends on how thorough, specific, and helpful your feedback is.
- Test thoroughly. Download each submission, run it on both iOS and Android emulators in the lab.
- Grade using the rubric. Go through each criterion systematically, choosing the level that best matches what you observe.
- Provide detailed feedback. Write specific, actionable comments explaining what works well and what needs improvement.
- Be fair and constructive. Treat your peers like colleagues whose success matters to your team.
Deeper Dive: How Moodle Calculates Your Grade
You receive two grades in a Workshop, the submission grade and the assessment grade.
Submission Grade (90%)
Section titled “Submission Grade (90%)”The average of all peer assessments you received for your work.
Assessment Grade (10%)
Section titled “Assessment Grade (10%)”How well you assessed others, based on how close your assessments are to the “consensus”. Moodle compares all assessments of the same submission and finds the one closest to the average (the “best” assessment). Your assessment grade depends on how similar your assessment is to this consensus:
- If you grade similarly to the majority of assessors → Higher assessment grade
- If you grade very differently from everyone else → Lower assessment grade
- The teacher’s assessment can have more weight to help establish the consensus
Example: Three peers assess the same app. Two give similar scores across all criteria, one gives very different scores. Moodle identifies the two similar assessments as closer to consensus and gives them higher assessment grades. The outlier gets a lower assessment grade.
💻 Code Walkthrough
Section titled “💻 Code Walkthrough”For each assignment, I might randomly select a few students for a short (10-15 minute) one-on-one code walkthrough. You’ll be asked to explain your implementation, reflect on your design decisions, and answer a few questions. This helps ensure understanding, promotes academic integrity, and prepares you to communicate your work which is an essential skill for every developer. You can be selected for any assignment, so always be ready to walk me through your code.
We will be using GitHub to submit in this course. You can use either the Git CLI or you can also use VSC’s built-in Git GUI client.
| Visual Studio Code (GUI) | Command Line (CLI) | |
|---|---|---|
| 1 | Click the Source Control icon (third down on the left sidebar) | git status - View changed files |
| 2 | Click + to stage all changes, or + next to individual files | git add . or git add <filename> - Stage changes |
| 3 | Type a commit message in the text box, then click the ✔ to commit | git commit -m "Your message" - Commit staged changes |
| 4 | Click ... and choose Push to upload your commit to GitHub | git push - Push commits to GitHub |
Commit frequently. It’s good practice, and it also creates a traceable history of your progress.
📥 Submission
Section titled “📥 Submission”Before submitting your assignment, ensure that your app includes all the necessary elements for your peers to properly evaluate your submission.
- Go to Moodle and click the link for this assignment in the calendar.
- Click the blue
Add Submissionbutton at the top of the workshop page.- Title: A1 Submission.
- Submission content: Describe your app briefly and any information your reviewers should know.
- Zip your assignment folder (without the
node_modulesfolder) and attach it as a file. If you care about anonymity:- DO NOT include your name in any of the files or folders
- DO NOT include the
.gitfolder before zipping, otherwise it will contain your commit history which has your name and email in it - Optionally, you may include your
.devlog.mdfile if you want to share your design diary with your reviewers
- Click the
Save changesbutton at the bottom. - You’ll be able to start assessing your peers the soon after the assignment is due, look out for an announcement on Teams for when this becomes available.