reTerminal built-in devices#
Programmable interfaces#
This section is based on the official documentation for the reTerminal: Hardware and Interfaces Usage
All programmable data can be passed in file streams that can be read and/or written to.
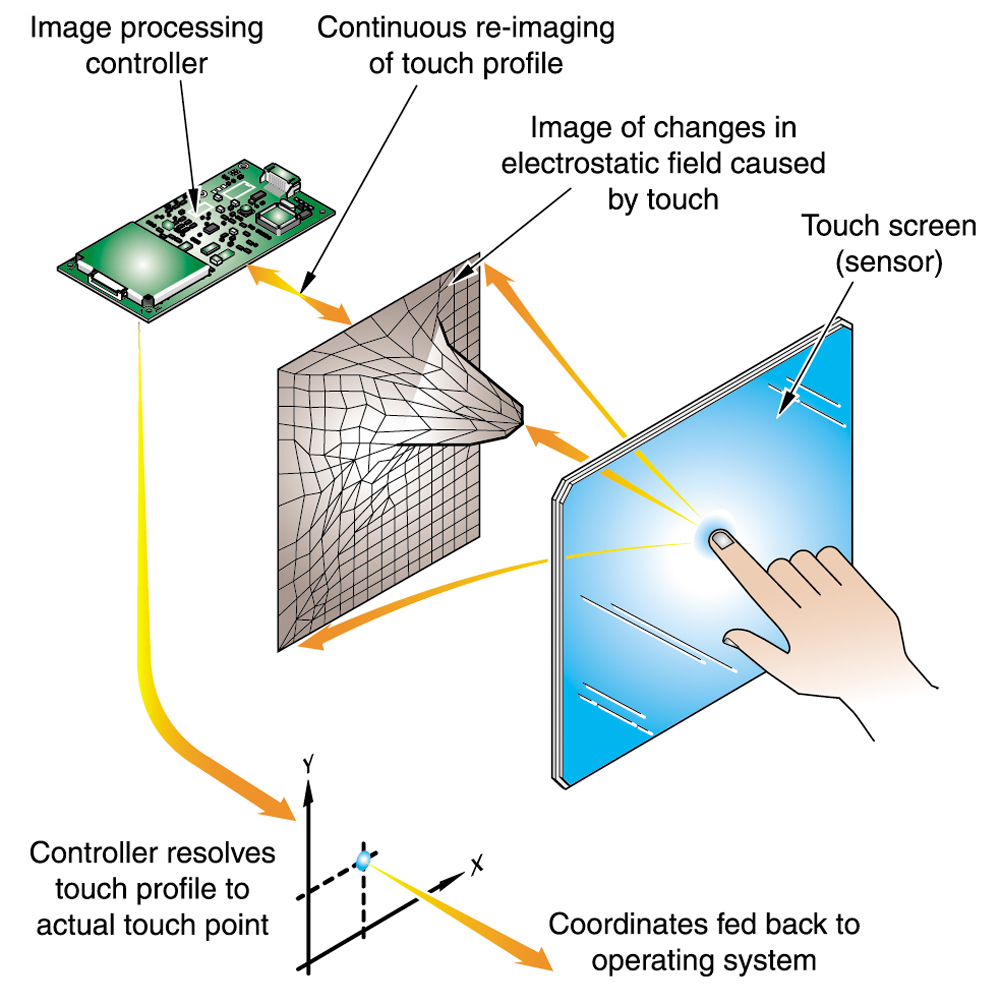
A diagram showing how the electrostatic field changes caused by touch is processed by devices like the reTerminal.#
For example, keyboard inputs and communication over web-sockets are all read as a file streams.
The reTerminal has 3 programmable LED’s and a light sensor that can be controlled like a regular file.
You can see, there are 3 programmable LEDs in the reTerminal:
STA light can be turned on as red or green.
USR light can only be turned on as green.
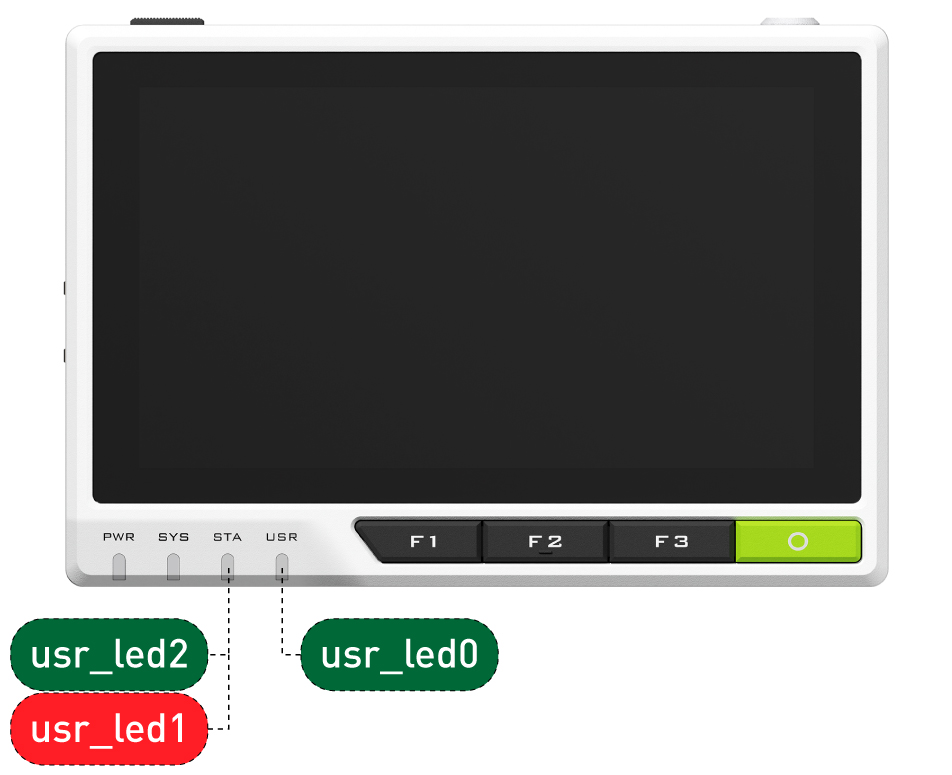
The reTerminal LEDs and their corresponding filenames. Image source#
The lights can be controlled at the OS level by editing files in the
/sys/class/leds/ directory. Use ls -al to list the files in this directory:
username@hostname:/sys/class/leds/usr_led0 $ ls -al
total 0
drwxr-xr-x 3 root root    0 Jan 25 20:33 .
drwxr-xr-x 8 root root    0 Jan 25 20:33 ..
-rw-r--r-- 1 root root 4096 Jan 26 22:02 brightness
The brightness file inide the usr_led0 controls the brightness of LED0. But,
because only root has write permissions to this file, we will likely run into
permissions errors if we try to edit the value directly:
$ nano /sys/class/leds/usr_led0/brightness
Permission denied

$ echo 255 > /sys/class/leds/usr_led0/brightness
Permission denied

$ sudo echo 255 > /sys/class/leds/usr_led0/brightness
Permission denied
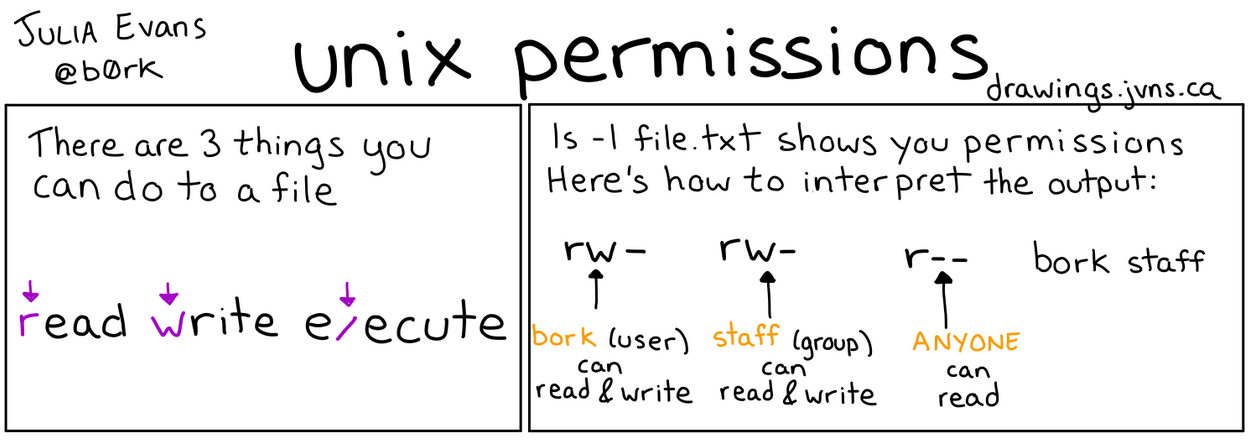
Unix Permissions cheatsheet by Julia Evans. See more about permissions in the bash course notes.#
There are a few possible approaches to this problem:
Use sudo + text-editor#
You can open a text-editor with root permissions using sudo:
# nano text editor
sudo nano /sys/class/leds/usr_led0/brightness

# or, you can use vi/vim text editor
sudo vim /sys/class/leds/usr_led0/brightness
Edit the brightness file to a value between 0-255 using the editor. When you
save, you should see the change immediately.
Use sudo + su#
Using an editor is perfectly reasonable for a one-off change, but annoying if you want to make the change more often.
We can use the echo value > /path/to/file pattern, but only if we have
permissions to write to /path/to/file – we can obtain these permissions if we
run the entire command as the root user.
NOTE: Running commands as the root user can have unintended consequences, ranging from annoying/tedious to fix, to completely devastating/permanently ruinous for your machine. You should avoid being
rootwherever possible (see Use sudo + tee section below for how to avoid it for this problem).
You can enter a root shell instance using the command su (switch user), or
by using sudo -i or sudo -s:
user@hostname $ sudo su
root@hostname #

user@hostname $ sudo -i
root@hostname #

user@hostname $ sudo -s
root@hostname #
Your shell should now display root@hostname:~# .
Turn on the LED with maximum brightness
# echo 255 > brightness
Turn off the LED
# echo 0 > brightness
Similarly, you can control usr_led1 and usr_led2 and even the buzzer on
/sys/class/leds/usr_buzzer
When done working as root, you can exit the root shell and return to your user
shell using the exit command (or Ctrl-D as a hotkey):
root@hostname # exit
user@hostname $
Use sudo + tee#
If we want to avoid using a text editor, AND avoid logging into a root shell
instance, it would be great if something like this worked:
$ sudo echo 255 > /sys/class/leds/usr_led0/brightness
But it doesn’t! Can you understand why? Consider which part of the instruction
sudo applies to. Unfortunately, there is no way to sudo > or sudo filename
since sudo executes commands as the root user, NOT filenames/redirects.
What if there were a command that we could put after the redirect, and sudo
that command? What would that command need to do? It’s time to introduce a “new”
command: tee.
To be clear, tee is a 50 year
old program and an absolute classic – it is as ubiquitous/essential as the
other OG unix programs like ls, cat, echo. We will see why in the
following example.
Try running man tee in your reTerminal. You should see something like the
following:
TEE(1)

NAME
       tee - read from standard input and write to standard output and files

SYNOPSIS
       tee [OPTION]... [FILE]...

DESCRIPTION
       Copy standard input to each FILE, and also to standard output.
We have here a command that will read from standard input, and write that same content from standard input into BOTH standard output AND files – the files we can specify as arguments.
$ echo 255 | /sys/class/leds/usr-led0/brightness
# this command is missing `tee` and `sudo`.... find where to put them, and you've learned a very important unix pattern!
Luminosity Sensor#
The digital light sensor can read the surrounding light levels.
Enter the following directory
cd /sys/bus/iio/devices/iio:device0
Read the following file to obtain the light intensity value in Lux
cat in_illuminance_input
Output:
pi@raspberrypi:/sys/bus/iio/devices/iio:device0 $ cat in_illuminance_input
2719
Note: We don’t need to be root to read this file. Its permissions are set to let all users read it, even-though it belongs to the root user:
rw-r--r-- 1 root root 4096 Jan 30 22:16 in_illuminance_input
Python Library for reTerminal#
Note
This section assumes you are already familiar with python virtual environments, which are covered for the first time in Part 3 of Lab 3
Seeed Studio provided a python library to access most of the sensors and actuators of the reTerminal.
Install the library seeed-python-rpi (see official
Github repo) using
pip:
# NOTE: run this with a venv activated!
pip install git+https://github.com/Seeed-Studio/Seeed_Python_RPi/

# NOTE: you will also need this dependency
pip install RPi-GPIO
Now you can import it to a test script (eg. buzz.py)
import seeed_python_rpi.core as rt
import time

print("BUZZER ON")
rt.buzzer = True
time.sleep(1)

print("BUZZER OFF")
rt.buzzer = False
This will sound the buzzer of the reTerminal for 1 second.
To run the script:
sudo $(which python) buzz.py
Alternatively, first elevate your shell, then execute the script normally:
user@hostname:~ $ sudo -i
root@hostname:~# python buzz.py
Note: this library is simply a wrapper to the OS operations we did in the previous section.
See the official seeed-python-reterminal
Github repo for API
reference on how to control:
LED’s
Accelerometer
Programmable Buttons
Light Sensor
Screen orientation#
In Landscape mode on the reTerminal, we were able to temporarily set the orientation of the reTerminal screen to be in landscape mode.
To make the change permanent, we need to update the configuration for the reterminal window manager.
1. wlr-randr#
First, run the command wlr-randr on your reterminal:
DSI-1 "(null) (null) (DSI-1)"
  Make: (null)
  Model: (null)
  Serial: (null)
  Physical size: 62x110 mm
  Enabled: yes
  Modes:
    720x1280 px, 60.000000 Hz (preferred, current)
  Position: 0,0
  Transform: normal
  Scale: 1.000000
  Adaptive Sync: disabled
Take a look at the Modes and Transform keys in the output above. We see that there’s
only one possible mode – but, we can use Transform to make rotations.
2. kanshi configuration#
kanshi is a program used for setting display prerefences for Wayland window managers on
linux. We can set a preferred Transform setting using the kanshi config file, located
at ~/.config/kanshi/config:
profile {
		output DSI-1 enable scale 1.000000 mode 720x1280@60.000 position 0,0 transform normal
}
Change the transform argument to 270 to flip the orientation to landscape mode (90
results in an upside-down orientation relative to the reterminal interface.)
When you restart the reterminal the change will take place automatically.
3. labwc configuration#
Rotating the screen unfortunately does not automatically rotate the “touch” features of
the screen – you’ll find that the touchscreen will behave strangely (in fact, the “touch” is still oriented in portrait)
unless you make the change below to the window manager configuration file ~/.config/labwc/rc.xml:
<?xml version="1.0"?>
<openbox_config xmlns="http://openbox.org/3.4/rc">
    <touch deviceName="seeed-tp" mapToOutput="DSI-1" mouseEmulation="yes"/>
</openbox_config>