A1: reTerminal Control Center#
Overview#
In this assignment, you will make a prototype of the applications you deploy on your reTerminal for your project.
The stack will be:
Python backend for managing on-board and external devices
Typescript frontend for interfacing with the reterminal touchscreen
HTTP communication between the backend and the frontend.
This assignment will use similar techniques from previous labs (bash and python scripting) to control devices, but will require a bit more structure to create a solid foundation for future development.
The idea is to create a quick (NOT perfect) prototype to demonstrate that the technology stack we’ve chosen will suffice for the basic set of problems. In future assignments and project milestones, we will tweak and perfect this stack. So: don’t sweat trying to make the code perfect in this assignment – we’ll get there.
Getting Started#
Ensure your
courseworkinstructionsbranch is up to dateCreate a branch called
a1for your work on this assignment off ofinstructions.On your
a1branch, create a directory calleda1.
New Dependencies#
We will be using more advanced project management tools for this assignment.
In your App Dev class, you use bun to manage typescript dependencies – we will do that
here, as well as using a similar tool called uv for our python dependencies
Instructions for installing
uvon your developer environment/reTerminalInstructions for installing
bunon your developer environment/reTerminal
Note
You may also need node separate from bun, you can install this with the
following command:
$ curl -o- https://raw.githubusercontent.com/nvm-sh/nvm/v0.39.3/install.sh | bash
$ nvm install node
See https://github.com/nvm-sh/nvm?tab=readme-ov-file#install–update-script and nvm-sh/nvm for more information.
Make sure you install uv, bun, and node on both your reterminal and your developer
environment.
Project structure#
Once you have uv installed:
After running uv init controller in the a1 directory of your coursework repository.
You should end up with following structure in your coursework repository on branch a1:
coursework-<your-repo-name>/
├── a1
│   └── controller
│       ├── main.py
│       ├── pyproject.toml
│       └── README.md
├── <other-lab-directories>
(10) Device Scripts#
First, you will create
Add the following files to your controller directory:
coursework-<your-repo-name>/
├── a1
│   └── controller
│       ├── led.py # for controlling an LED
│       ├── fan.py # for controlling a fan
│       ├── aht20.py # for controlling the aht20 temp/humi sensor
Hardware Setup#
This assignment will use three of the devices in your reTerminal kit:
the LED
the fan + relay for powering the fan circuitry
the AHT20 for temperature/humidity readings
For each of the three devices there is a bit of custom set up.
Instructions for setting up device can be found here: https://docs.google.com/document/d/1KQtT8Uj5ExVKaLA7Ey5N58Vd93QWsowbqu-CDyIw36s/edit?usp=sharing
The instructions above are from an old lab – don’t focus on making the code match the requirements exactly. We will be making changes to it in the following steps.
Important
The Seeed-grove.py library is no longer recommended – it does not work.
Instead, include the following code in your aht20.py file:
AHT20 Sensor Code
from gpiozero import Device
from time import sleep
from smbus2 import SMBus

# Adapted from https://github.com/Seeed-Studio/grove.py/blob/master/grove/grove_temperature_humidity_aht20.py
# Credits to Brandon/Emile/Vlad/Others for helping with this solution.
class AHT20(Device):
    def __init__(self, address=0x38, bus=4):
        self.address = address

        # I2C bus
        self.bus = SMBus(bus)

        # init sensor
        self.bus.write_i2c_block_data(self.address, 0xBE, [0x08, 0x00])
        sleep(0.02)

    def read(self):
        self.bus.write_i2c_block_data(self.address, 0xAC, [0x33, 0x00])
        sleep(0.08)

        data = self.bus.read_i2c_block_data(self.address, 0x00, 7)

        humidity = ((data[1] << 16) | (data[2] << 8) | data[3]) >> 4
        humidity = humidity * 100 / 1048576.0

        temperature = ((data[3] & 0x0F) << 16) | (data[4] << 8) | data[5]
        temperature = temperature * 200 / 1048576.0 - 50

        return temperature, humidity

# ...

# Example of using the above class
class TemperatureSensor(Sensor)
    device: AHT20
    # ... rest of class definition ...

# ...

if __name__ == "__main__":

    # You can only have one of these devices instantiated at a time
    aht20_device = AHT20(bus=4)

    # But the device can be shared across two Sensor classes.
    TemperatureSensor(device=aht20_device)
    HumiditySensor(device=aht20_device)
Scripts#
Each of the device files (led.py, aht20.py, fan.py) should have a __main__ execution statement.
This will allow you to test the file directly:
Note
To see the point of the if __name__=="__main__" statement, see the
course notes on python Top-level environment
Requirements#
To get marks for this part of the lab:
commit & push your changes to the
a1branchSometime before the deadline, In-person demo your scripts to me, showing that all three devices work.
Note
Make sure you are using uv to manage your dependencies. Your pyproject.toml file
should have a complete list of all the dependencies needed for this project.
uv add <dependency name>
uv remove <dependency name>
(45) Device Controller Backend#
For this part of the assignment, we will be setting up a Python backend for communicating with the device code you’ve made.
Make the following adjustments:
├── a1
│   └── controller
│       ├── app.py # Rename main.py -> app.py
│       ├── model.py # For making sure the above have a common interface
Create a model#
To make the devices
Add the following code to model.py:
from typing import Any

class Sensor():
    device: Any
    UNIT: str = ""

    def __init__(self, device: Any):
        self.device = device

    def read_sensor(self) -> str:
        """Takes a reading of the sensor, and returns the result as a string."""
        pass

class Actuator():
    device: Any
    state: str = ""

    def __init__(self, device: Any):
        self.device = device

    def control_actuator(self, state: str) -> str:
        """Changes the internal state of the actuator, and returns the new state as
        a string."""
        pass
Using the model#
Create python classes in your led.py, fan.py, and aht20.py files. These classes
should be:
class TemperatureSensor(Sensor);
    device: AHT20 # see Hardware Setup instructions for explanation of the AHT20 class
    UNIT = "°C" # unit of measurement for Temperature

    def read_sensor(self):
        """TODO: implement this method@"""
        # Should return the temperature and the unit of measurement as a string
        pass

class HumiditySensor(Sensor):
    # Similar to above
    UNIT = "%" # unit of measurement for Humidity

class Fan(Actuator):
    # similar to above
    pass

class LED(Actuator):
    # similar to above
    pass
Then, implement the classes. That means: each class should have implementations for the functions of its parent class.
Using FASTAPI#
We will make the devices externally accessible using a library called FastAPI.
First, add the dependency to your project using uv:
uv add fastapi['standard']
You can then modify app.py so that you can add endpoints to your python backend: https://fastapi.tiangolo.com/tutorial/first-steps/
Requirements#
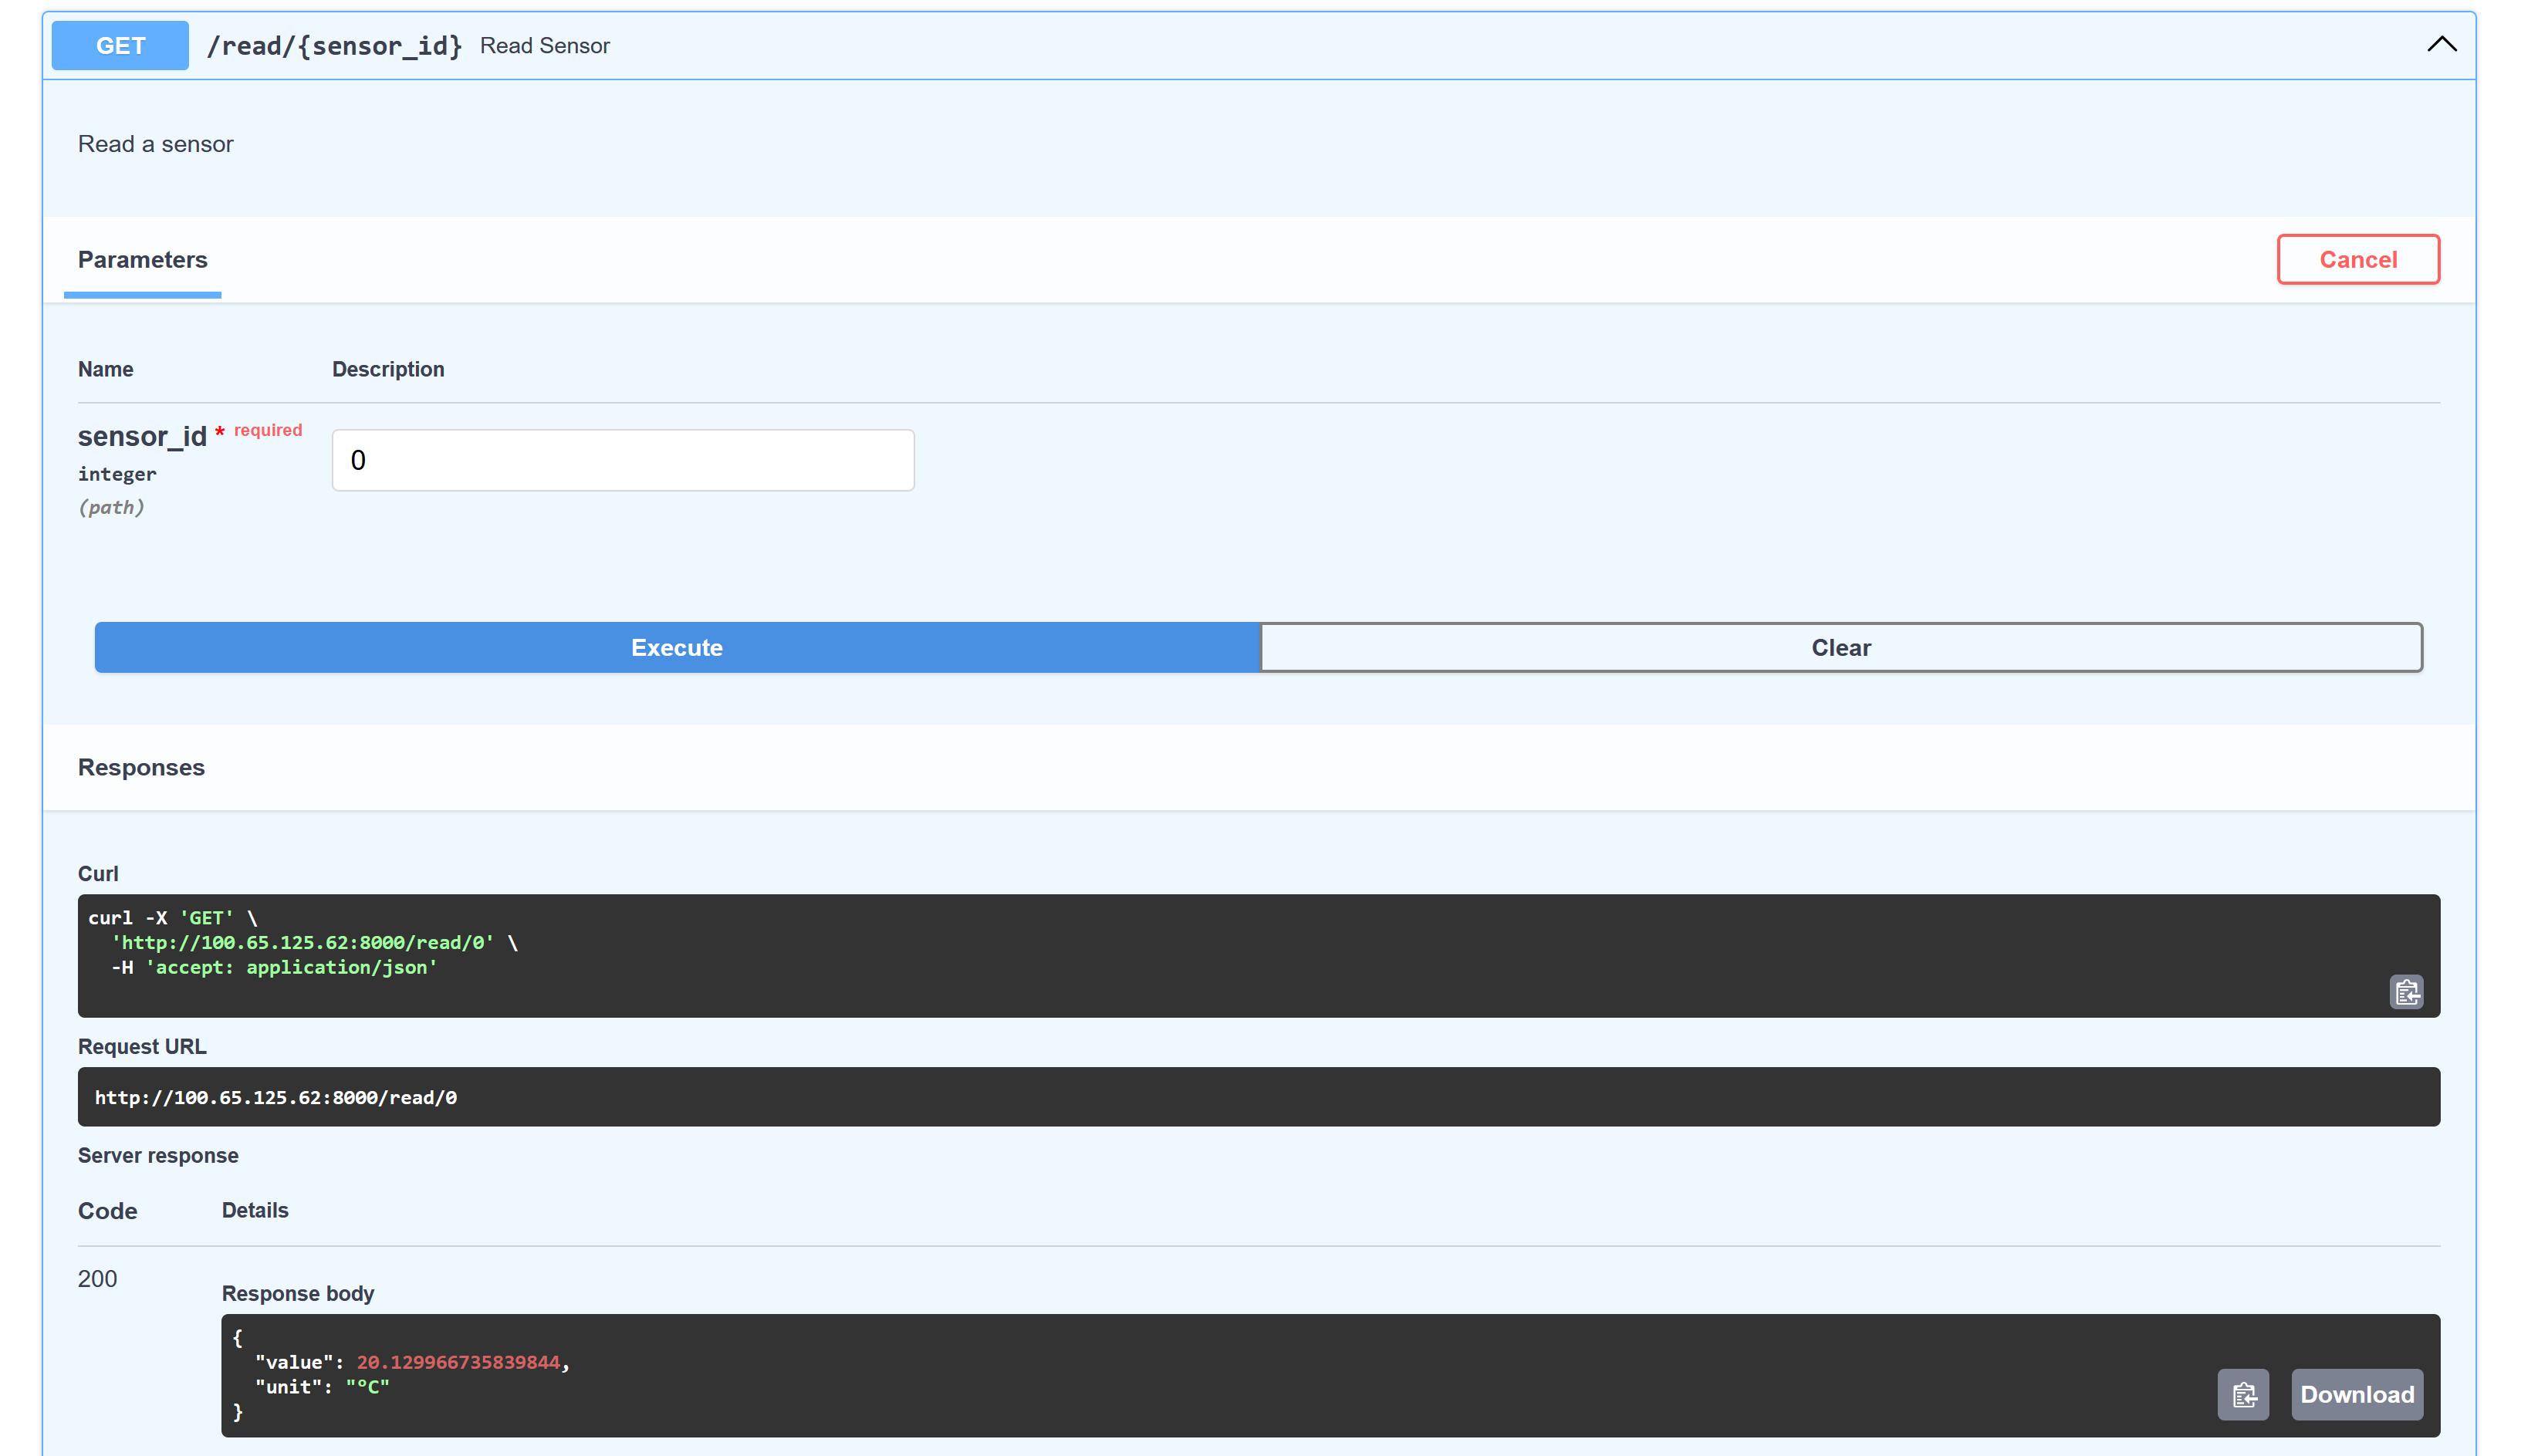
You should have the following endpoints:
/read/{sensor-id}: a GET request for a reading from the given sensor/control/{actuator_id}: a PUT request to change the state of the actuator
You should have unique ids for 1 temperature sensor, 1 humidity sensor, 1 fan actuator, and 1 LED actuator.
For marks for this part of the assignment:
push working code to
a1branch of your repositoryIn person demo of the API working
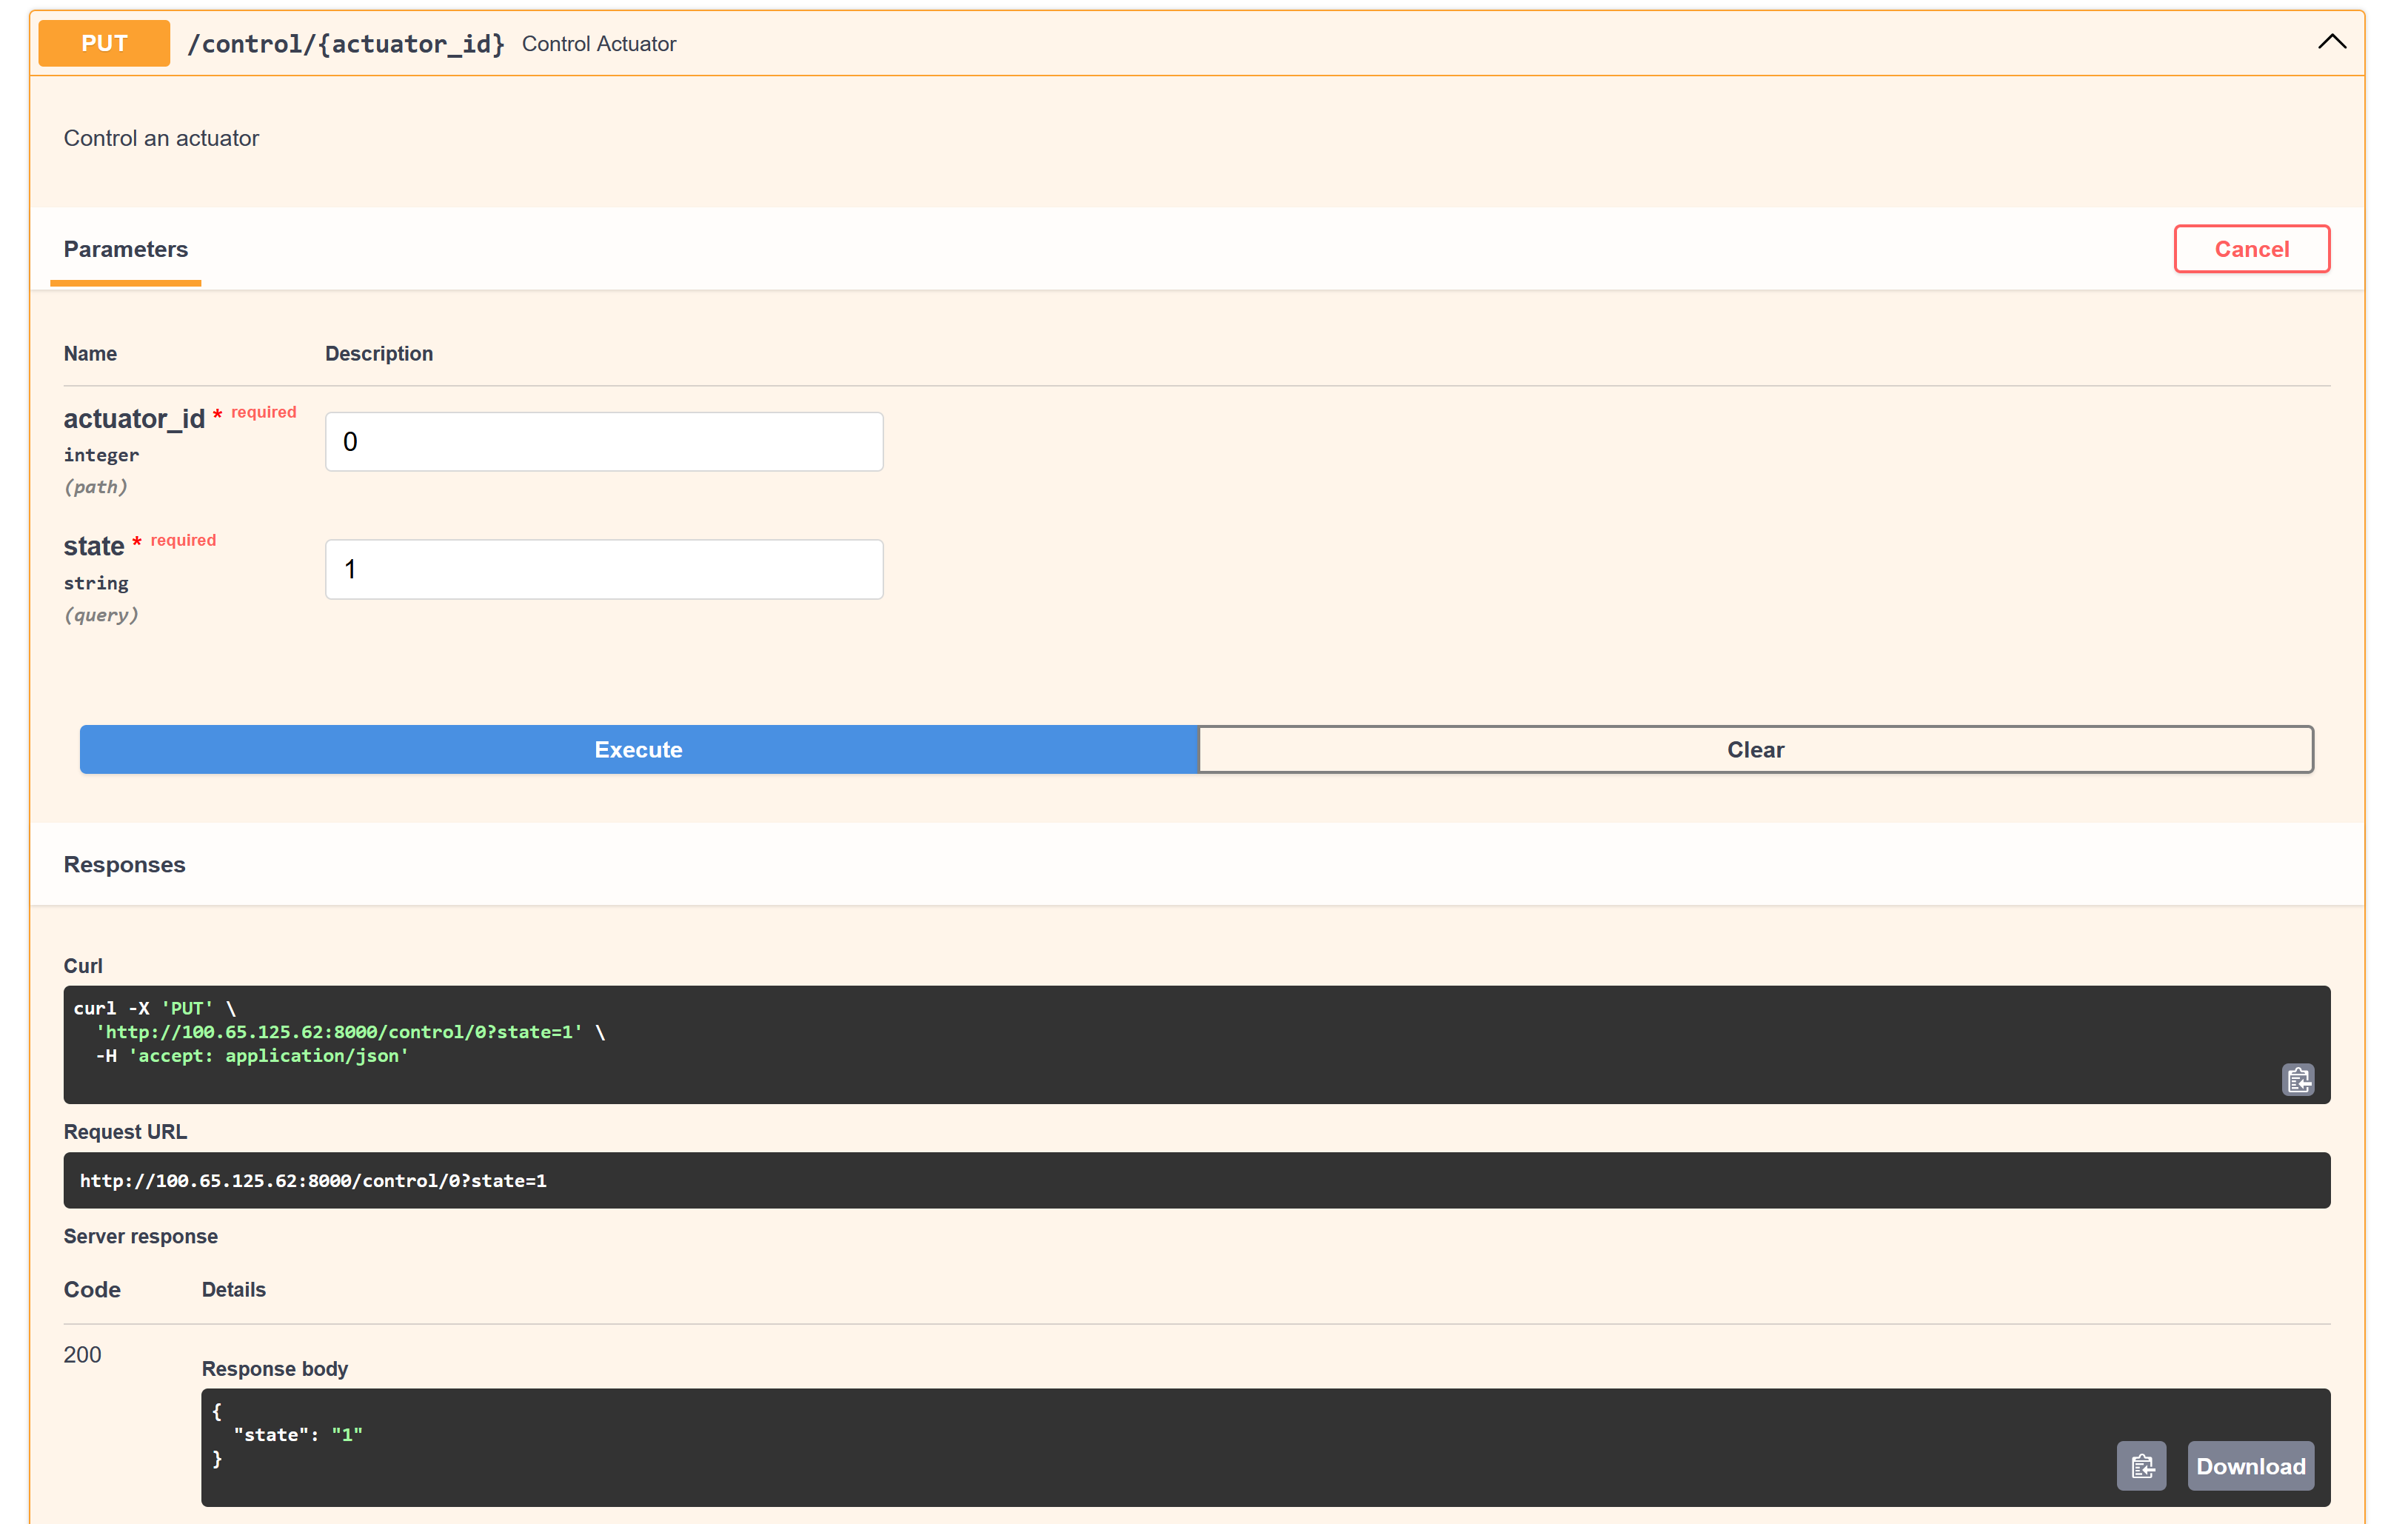
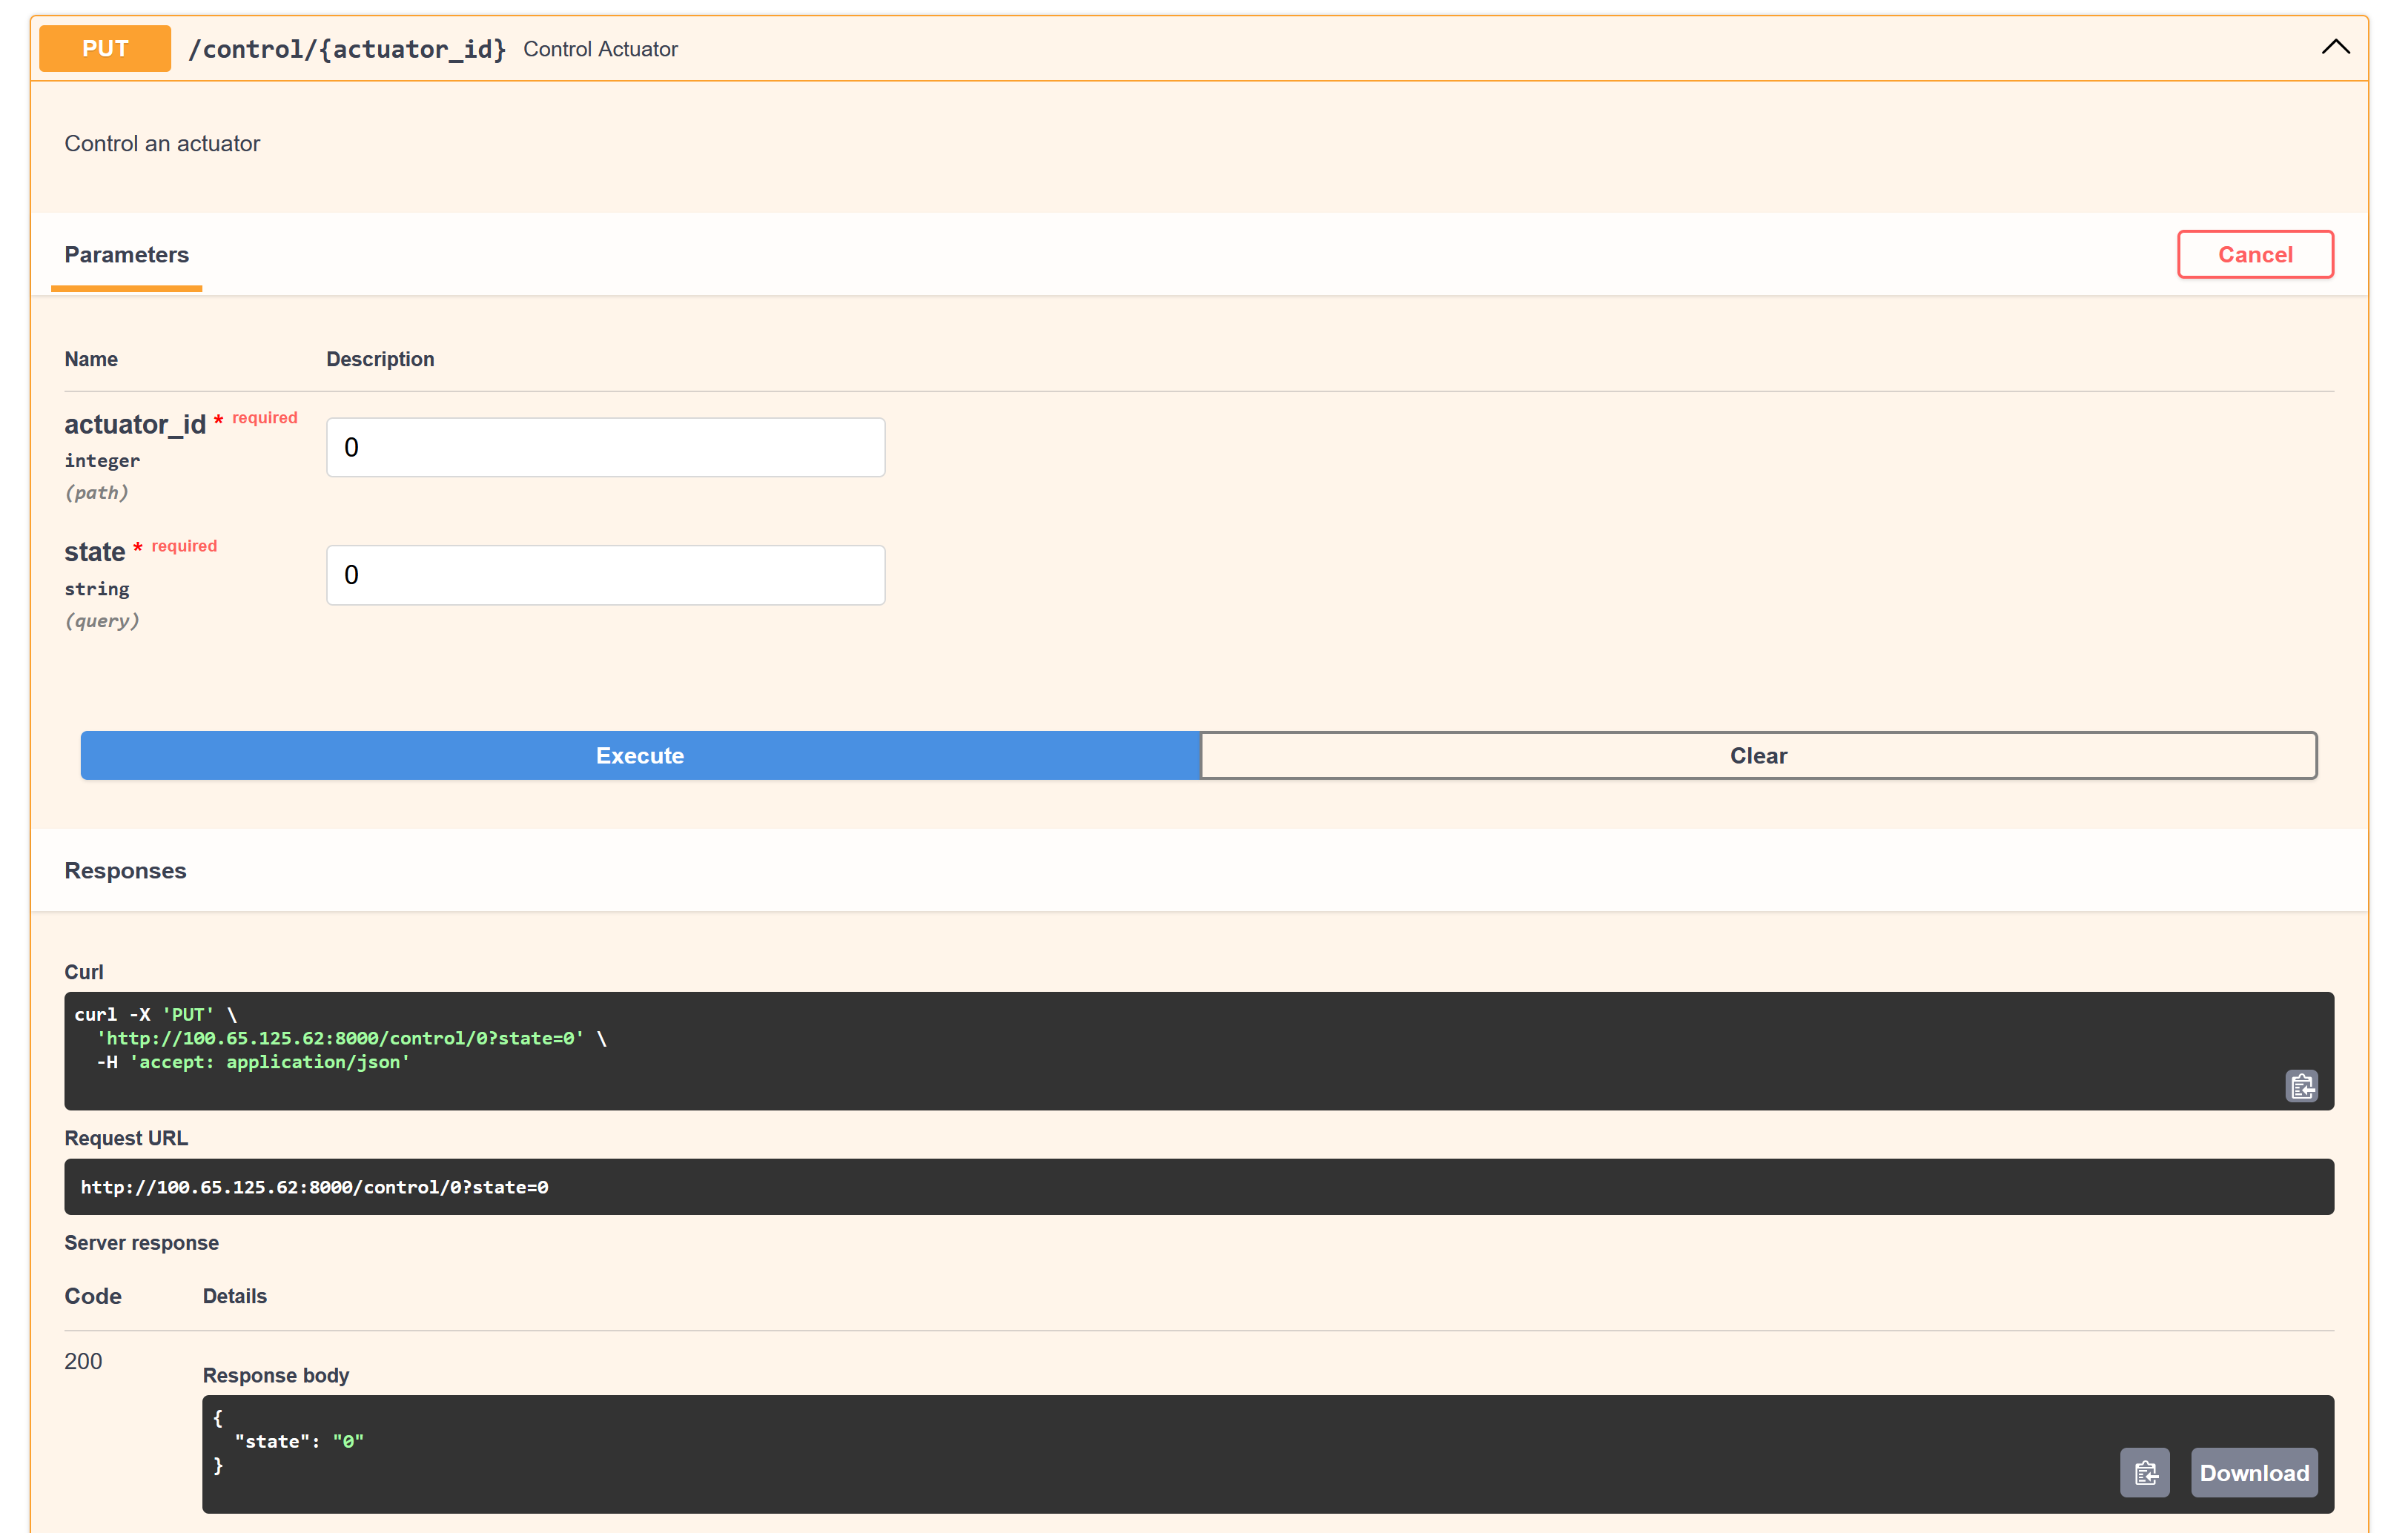
Example#
Using the docs/ endpoint of the fastapi server, you should be able to control your
devices using an interface that looks like the figures below:
(25) Dashboard#
To use the API we’ve created, we’ll set up a quick prototype frontend.
This isn’t a UI or App-Dev course, so the choice of the frontend framework is up to you. I will provide hints/structure for a few different choices:
Typescript: React Web (I’m doing this: it uses html/css/ts components instead of react-native)
Quickstart:
bunx electrobun init dashboard. When asked for a template, I chose thereact-tailwind-vitetemplate, and it has been working well so far.Note: you will need to install all of the applications listed in the Linux section of the electrobun install instructions
Typescript: React-Native for Web (same components/architecture as App Dev III)
Quickstart:
bunx create-expo-app dashboard --templateNote: follow the documentation for creating a
react-native-webapp on expo: https://docs.expo.dev/workflow/web/
Python: Python GTK, PythonQT, [Python tkinter][(https://docs.python.org/3/library/tkinter.html)
You’re also free to use a framework not listed here, but you are on your own in that case.
Structure#
Initialize a dashboard subdirectory using the framework of your choice:
coursework-<your-repo-name>/
├── a1
│   └── controller/
│   └── dashboard/
│       ├── <source folders>*
│       ├── bun.lock
│       ├── package.json
│       └── <other configuration files>*
*Note: the names of the <source folders> and the <other configuration files> can vary,
depending on whether you use React Web or React-Native for web. The exact names of the
source folders and extra configuration files don’t matter; what matters is the project
files (package.json, bun.lock) are in the dashboard directory along with the dashboard
source code, and are separate from the controller project files/source code.
coursework-<your-repo-name>/
├── a1
│   └── controller/
│   └── dashboard/
│       ├── main.py
│       ├── pyproject.toml
│       └── README.md
Requirements#
The requirements for the dashboard are:
A toggle switch (or equivalent UI, like a button) for each actuator (the LED and the Fan)
Part marks: dummy interface that “toggles” but does not interact with the controller backent
Full marks: sends a PUT request to turn on/off the correct actuator
Live readings generated every 1-2 seconds for each sensor (Temperature and Humidity)
Minimum: dummy interface that displays a fake sequence of humidity/temperature data over time
Decent: Live readings in the form of a textbox that updates every 1-2 seconds (retrieved using a GET request to the local server)
Best: a line/scatter plot that sends GET requests for humidity/temperature and updates the graph accordingly
Depending on which UI framework you choose, you should have readily available components
you can add to your dashboard dependencies to implement the above features.
For example, to render a live graph from sequences of data:
Generic Typescript:
React:
React Native:
Thanks to Leon for this recommendation: https://nearform.com/open-source/victory/
Python:
Note
Hint: if using React, you will need to use useState to manage the state of the actuators
and to store the sensor readings. You will also need to use useEffect and setInterval
to periodically request new sensor readings and to update your existing readings.
Example#
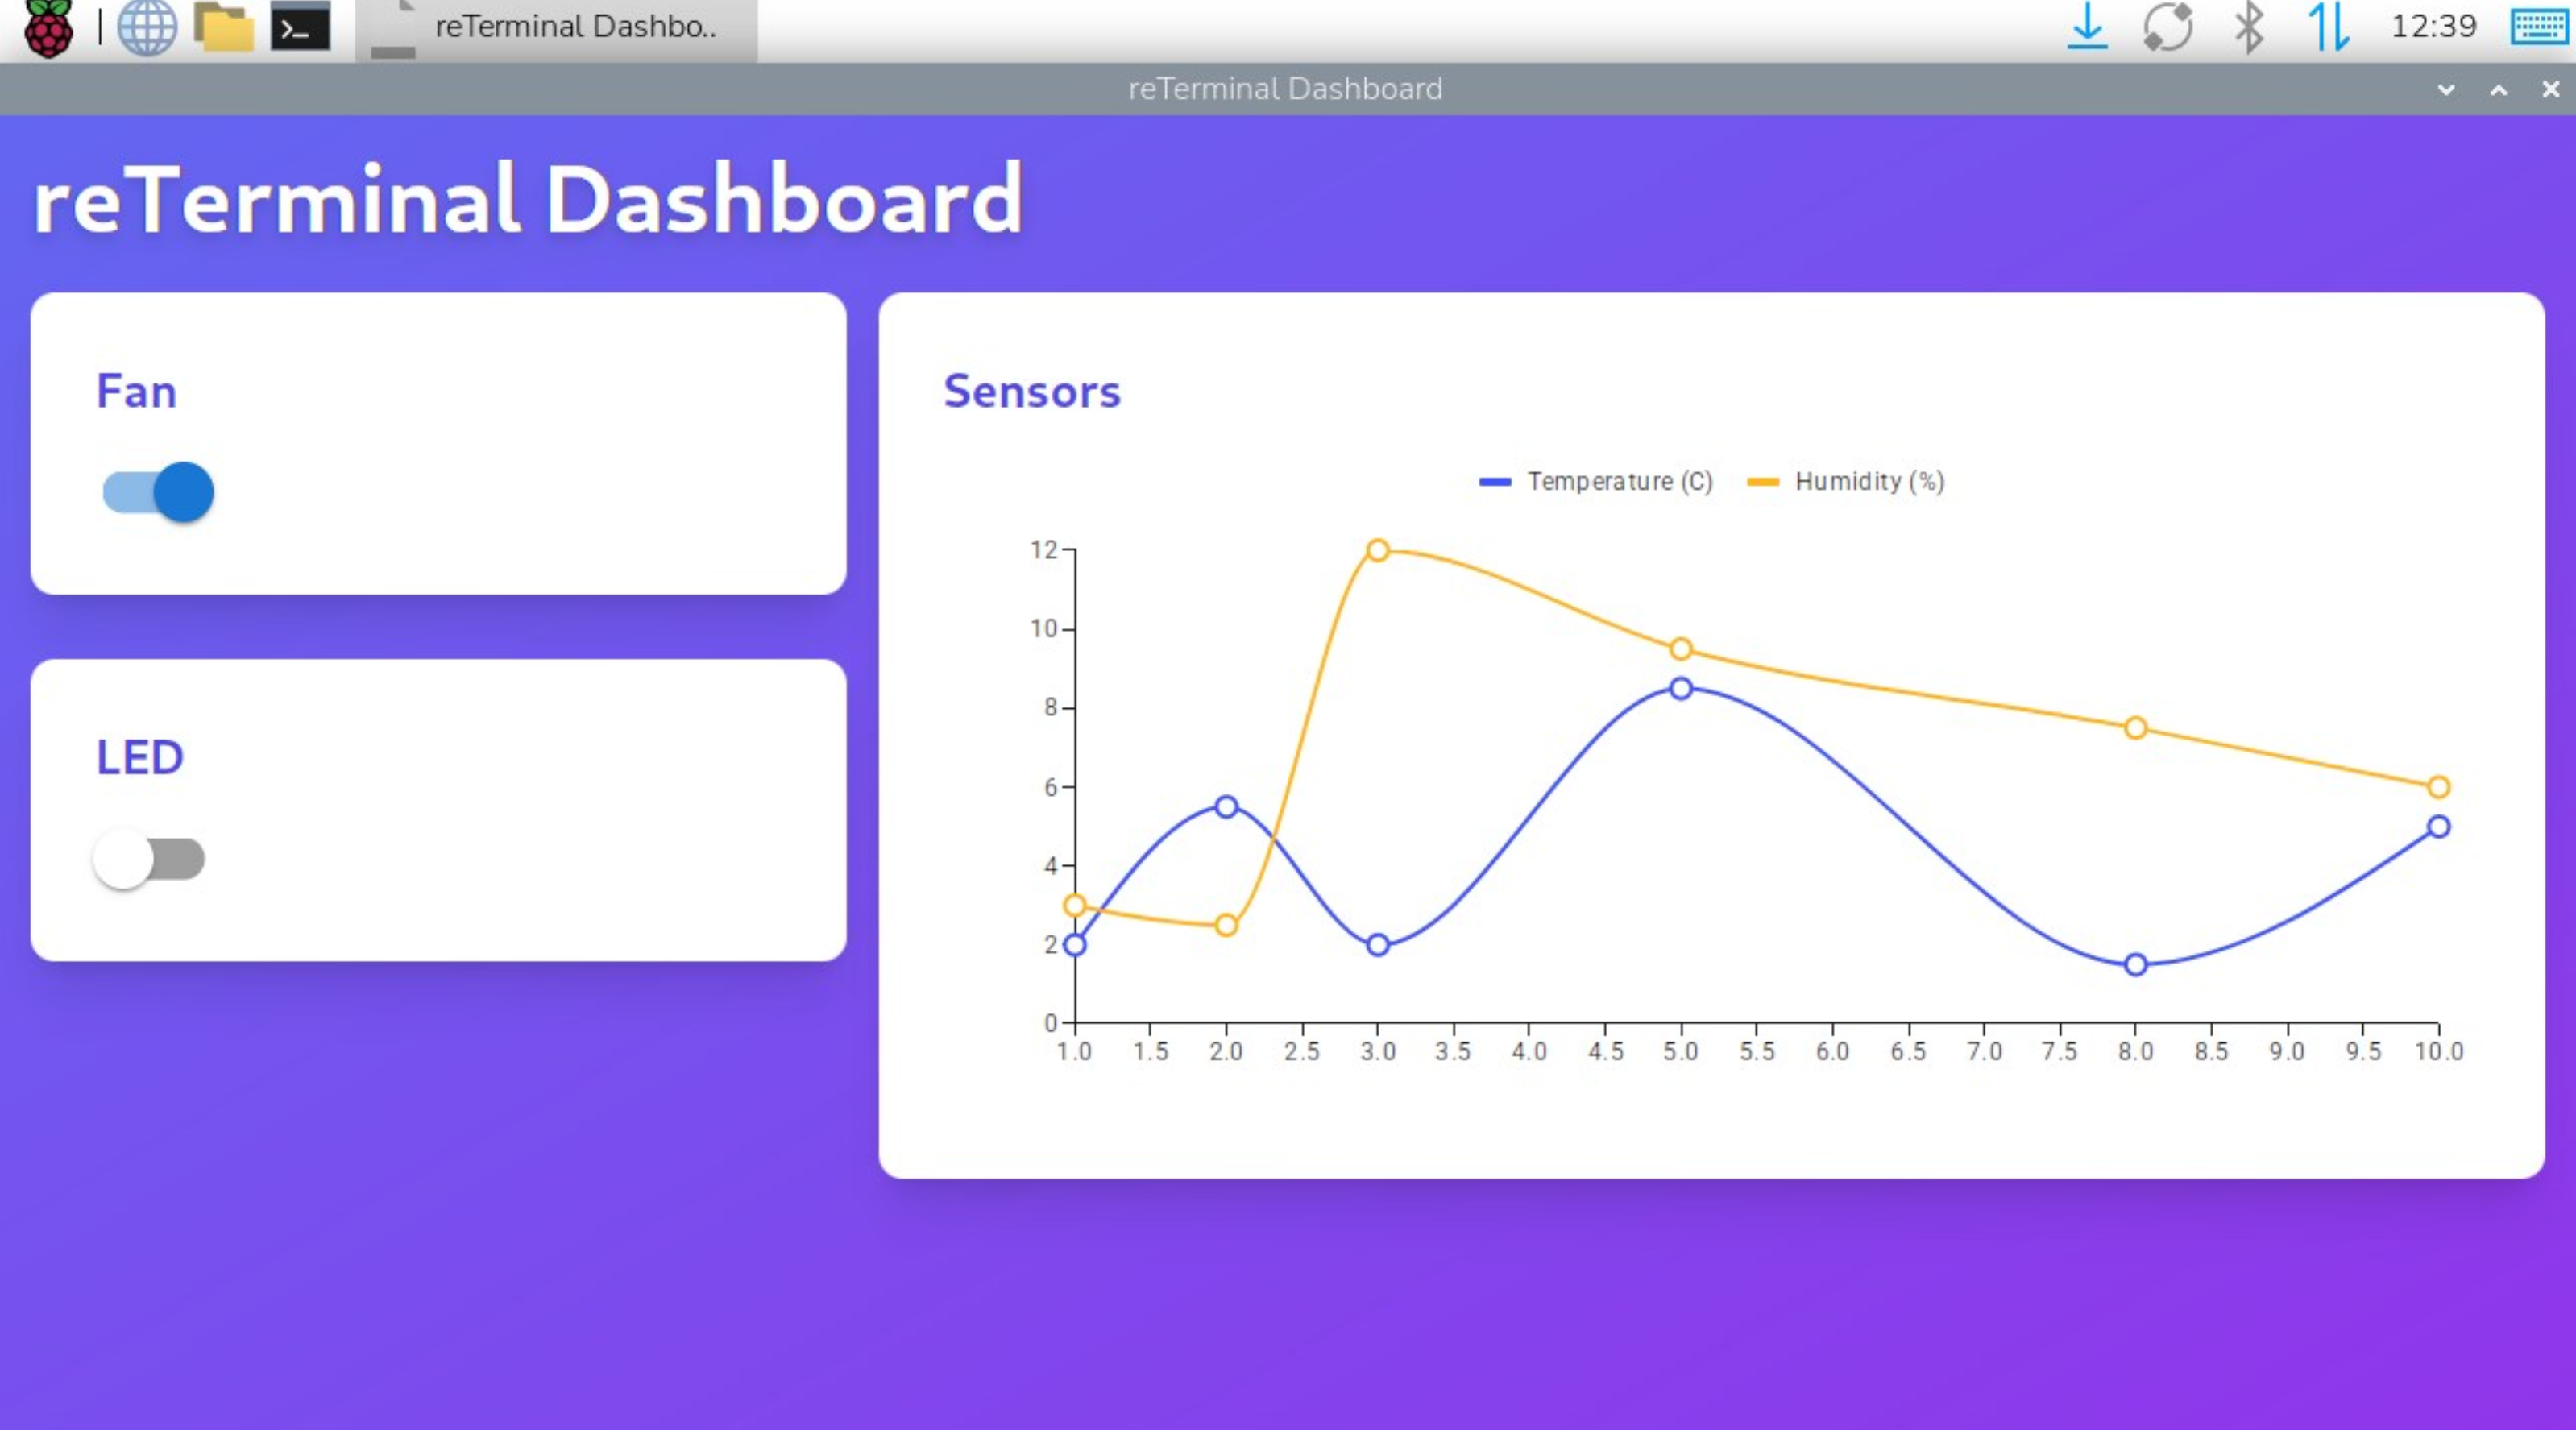
Example dashboard with the React library. Your UI does not need to look exactly like this, but it should have the same basic elements: actuator toggles, and a live reading of the sensor data.#
Rubric#
For each section, your grade will be determined by the following rubric:
(10) Device Scripts
In-class demo of the scripts for each device: LED, AHT20, and Fan with Relay
Relevant code pushed to a1 branch of coursework repository
(45) Device Controller Backend
In-class demo of the API interface scripts for each device: LED, AHT20, and Fan with Relay
Code pushed to a1 branch of coursework repository
(25) Dashboard
In-class demo of the dashboard interface working for each device: LED, AHT20, and Fan with Relay
NOTE: your Dashboard app must run and be usable on the reTerminal device itself. Make sure your buttons are big enough to press. See Landscape mode on the reterminal to manage the orientation of the reterminal device.
Code pushed to a1 branch of coursework repository
(10) Overall
Assignment structure followed (
a1/controlleranda1/dashboardcontain expected files)use of
uvandpyproject.tomlto maintain required dependencies for python backeneduse of
bunandpackage.jsonto maintain required dependencies for typescript frontend
In-class demo#
Any time before the due date, you can demo any of the above tasks to me in person. On the due date during class (Monday March 30), you will demo your progress for partial marks if not complete.
Tips & Tricks#
Note
Let me know if you encounter any useful tips & tricks for completing this assignment, I will add to this list as we go.
Backend API preview:#
Use fastapi run to run your API in production mode – this will let you access the web
interface using the tailscale IP address of your reTerminal
- The lab computers have tailscale installed on them, you can log into Tailscale
directly in order to access your reterminal
Dashboard preview:#
Use the program TigerVNC to connect to your reterminal over tailscale. (TigerVNC is already installed on the lab computers)
Landscape mode on the reTerminal#
There are two ways to enable Landscape orientation on your reTerminal:
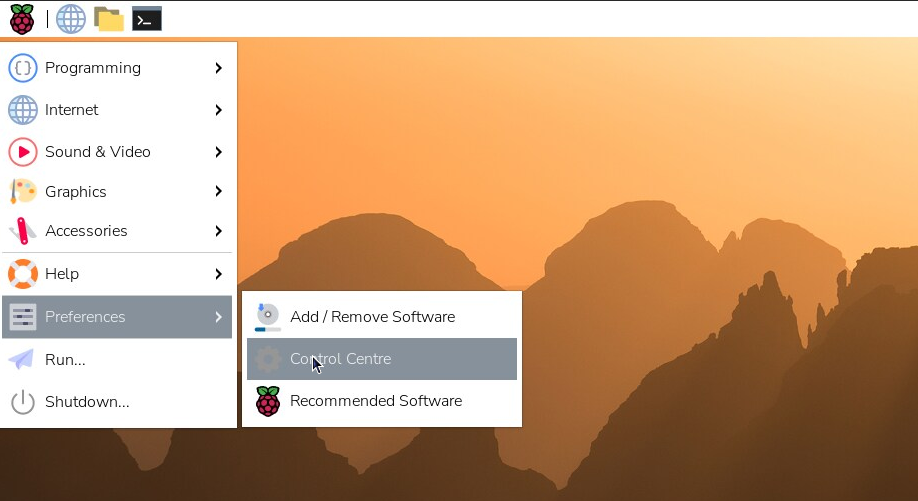
Getting to the control center on the reTerminal desktop.#
Using the GUI:
Navigate to the Control Centre of the reTerminal
Scroll down to the “Screens” submenu
Right-click on the display, update the orientation of the display.
Using the command line:
the reTerminal uses wayland for its display backend, meaning that the orientation of the screen can be controlled using the
wlr-randrutitlity that comes pre-installed on the reterminalUsing
wlr-randr:# Display all connected displays (the reTerminal screen) $ wlr-randr ... # 'transform' the reterminal screen to flip by 270 degrees $ wlr-randr --output <name of reterminal screen> --transform 270
cannot open display: error#
If you are faced with the following error when running your dashboard code over ssh:
[1] (bun:3887): Gtk-WARNING **: 11:54:23.186: cannot open display:
[1] Child process exited with code: 1
[1] error: script "start" exited with code 1
you can fix this by updating the DISPLAY environment variable in your ssh session
BEFORE running your dashboard code:
$ export DISPLAY=:0
$ <run your dashboard app>