L4: External GPIO devices using the Grove Base Hat#
Note
These instructions are now up to date (as of Feb 23).
Overview#
Last lab, we used system drivers installed on the reTerminal to control the chassis buttons, LED, touchscreen, etc.
In this lab, we will connect our first external device: an analog joystick that comes with a digital button-pressing mechanism.
We will use this joystick to control the mouse on our reTerminal – we will find that it works quite well to simulate motion and clicking!
Objectives#
To differentiate between digital and analog signals
To read simple digital signals using the Python GPIO Zero library.
To use an analog to digital converter (ADC) using the seeed-grove library.
To calibrate an electronic device (a joystick) that uses digital and analog signals
reTerminal system dependencies#
There are a few programs we need to install and configure and practise using before we are ready to program the joystick.
First, we will need ydotool; we will also need to ensure that the I2C interface is
enabled. Instructions follow below.
ydotool#
In order to control the mouse movement and clicks, we will install a program called
ydotool (“y do tool”) on the reTerminal. This will let us control the mouse/keyboard
programmatically.
ydotool is not included in the debian package repository by default, but we can compile
it ourselves:
# Ensure your apt repos are up to date
$ sudo apt update
# Prerequisite dependencies to install
$ sudo apt install git cmake scdoc pkg-config
$ git clone https://github.com/ReimuNotMoe/ydotool.git
$ cd ydotool
$ mkdir build
$ cd build
$ cmake ..
$ time make -j "$(nproc)"
$ sudo make install
Add the following line to your ~/.bashrc file on your reTerminal:
export YDOTOOL_SOCKET=/tmp/.ydotool_socket
Make sure you source your ~/.bashrc for the change to take effect.
Then, you will need the ydotoold program running as a background process for ydotool
to work:
$ sudo ydotoold & disown
# press enter a couple times
# keep this terminal window open
Important
The ydotoold program MUST be running as background process for ydotool to work.
Optionally, you can change the permissions of the /tmp/.ydotool_socket file so we can
use ydotool without sudo. For now we can simply change the permissions to 777 using
chmod: sudo chmod 777 /tmp/.ydotool_socket
Now we can try using ydotool:
Try following the ydotool examples about moving the mouse: ReimuNotMoe/ydotool
Try doing relative moves
Try doing absolute moves (what’s the difference between relative and absolute in this context?)
Try clicking
What are the boundaries for moving the mouse? (min/max x/y)
What happens when you move the mouse outside the boundary?
I2C Interface#
We will see that the reTerminal needs an extra interface enabled in order to take analog measurements using the Grove Base Hat.
To enable the I2C interface, follow the steps in these instructions: https://www.raspberrypi-spy.co.uk/2014/11/enabling-the-i2c-interface-on-the-raspberry-pi/
Once complete, you should be able to run i2cdetect on I2C bus #1 (command shown below):
$ i2cdetect -y 1

0   1  2  3  4  5  6  7  8  9  a  b  c  d  e  f
00:                         -- -- -- -- -- -- -- --
10: -- -- -- -- -- -- -- -- -- UU -- -- -- -- -- --
20: -- -- -- -- -- -- -- -- -- UU -- -- -- -- -- --
30: -- -- -- -- -- -- -- -- UU -- -- -- -- -- -- --
40: -- -- -- -- -- UU -- -- -- -- -- -- -- -- -- --
50: -- -- -- -- -- -- -- -- -- -- -- -- -- -- -- --
60: -- -- -- -- -- -- -- -- -- -- -- -- -- -- -- --
70: -- -- -- -- -- -- -- --
The UU indicates that the address at that position (0x1a, 0x2a, 0x39, and 0x46 in the results above)
are in use, which is what we’re hoping to see. We’ll learn more about the I2C protocol later.
Cabling#
We’ll be using the Grove Base Hat to connect the joysticks. Details about the cabling for each component follow below:
Grove Base Hat#
First, let’s make sure that the hat is connected to the reTerminal correctly. See the figure below:
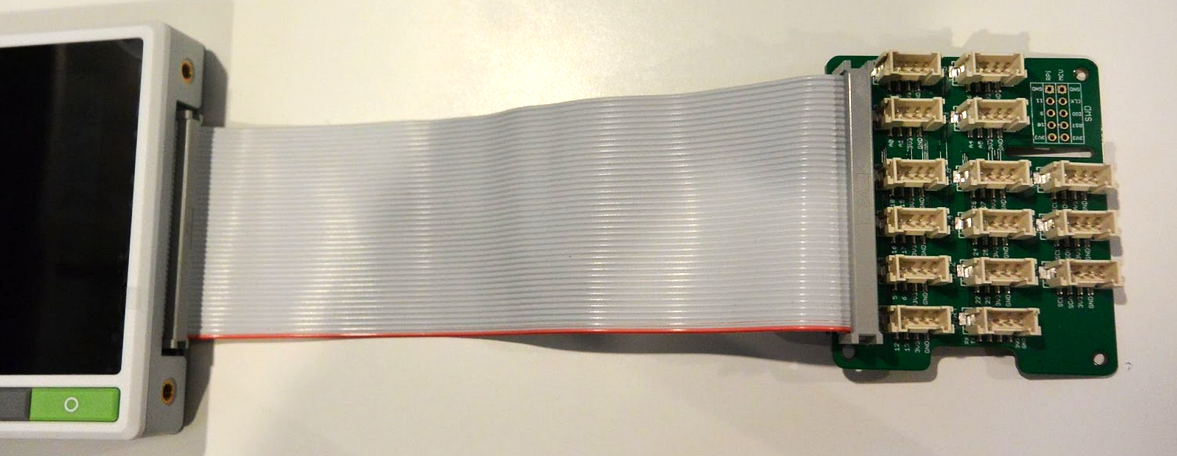
It is possible to plug the ribbon cable of the hat up-side-down. Ensure that the red line of the ribbon cable is aligned with the green button of the reterminal, and the PWM port of the base hat.#
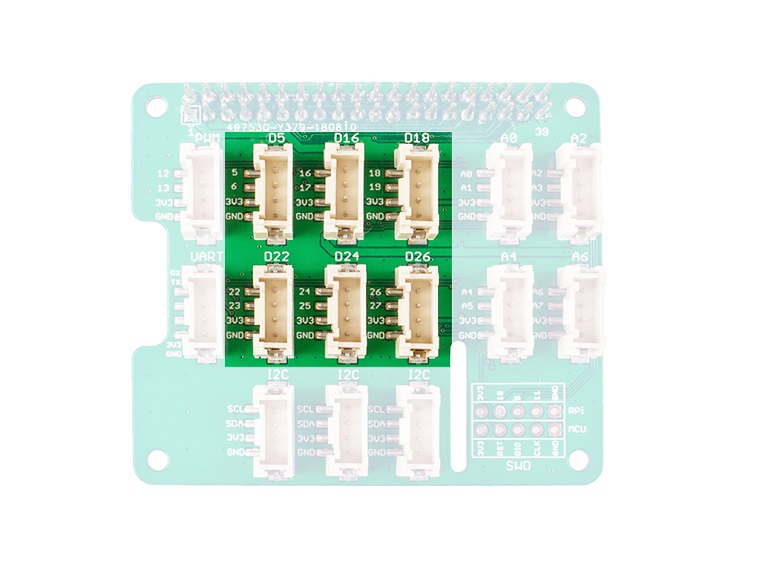
The Grove Base Hat has an Analog to Digital Converter (ADC) built in, and 4 ports we can plug in to use it:
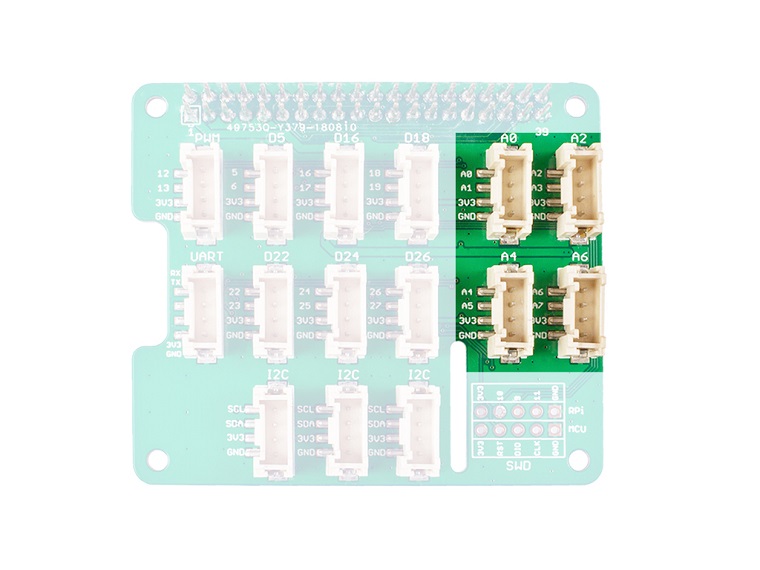
The 4 Analog ports of the Grove Base Hat ADC are highlighted. These ports include different 8 channels (A0, A1, … A6, A7) that we can read from.#
From the Grove Base Hat documentation:
… there is no ADC in the Raspberry Pi, so it can not work with analog sensors directly. The Grove Base Hat works as an external 12-bit ADC, which means you can use analog sensor with your Raspberry Pi.
Devices connected to the Grove Base Hat analog ports sensor inputs the analog voltage into the 12-bit ADC. After the ADC converts the analog data to digital data, it inputs the digital data to the Raspberry Pi through 1This is why we needed to enabled I2C in the previous section of this lab.the I2C interface1This is why we needed to enabled I2C in the previous section of this lab..
This process of converting an analog signal to a digital input using an n-bit interface is called encoding.
Joystick Wiring#
A joystick’s motion in the X and Y directions is an example of an analog signal: there are infinitely many different positions that the joystick could be.
Meanwhile, the joystick also allows you to press, representing a click of the mouse. This is an example of a digital signal.
You will have one of two possible joystick models. Both have 5 pins:
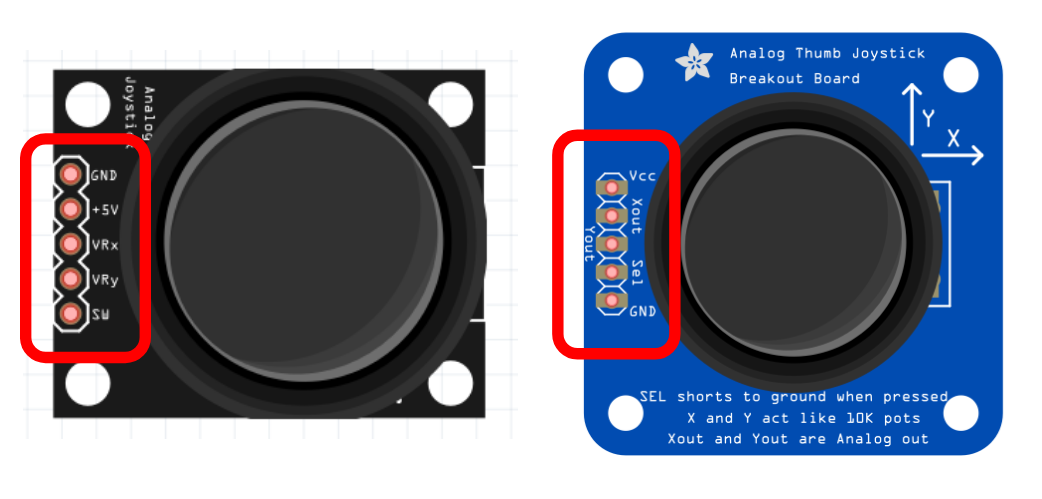
Top view of the two joystick models with the 5 pins highlighted. Take note of the labels for each pin – you must ensure your connections are correct for your circuits to work.#
The pin labels in the figure above have the following meanings:
GND: Electrical ground – 0V by definition. It is important that electrical components share the same ground, since voltage is a relative measure.
Vcc / +5V: Power source. Despite the label of +5V, this will be the same as the amount of voltage provided (so 3.3V when powered by the ports on the Grove Base Hat).
VRx / Xout: Analog Voltage for x-position. Between Vcc (see above) and 0V, depending on the position of the joystick.
VRy / Yout: Analog Voltage for y-position. Same as VRx/Xout.
SW / Sel: Switch signal. This is a simple button clicked with the joystick. Will produce on/off digital signal between Vcc and 0V.
Now that we know the meaning of the joystick labels, lets connect them to the base hat. The figure below shows how you match the pins correctly for the analog port:
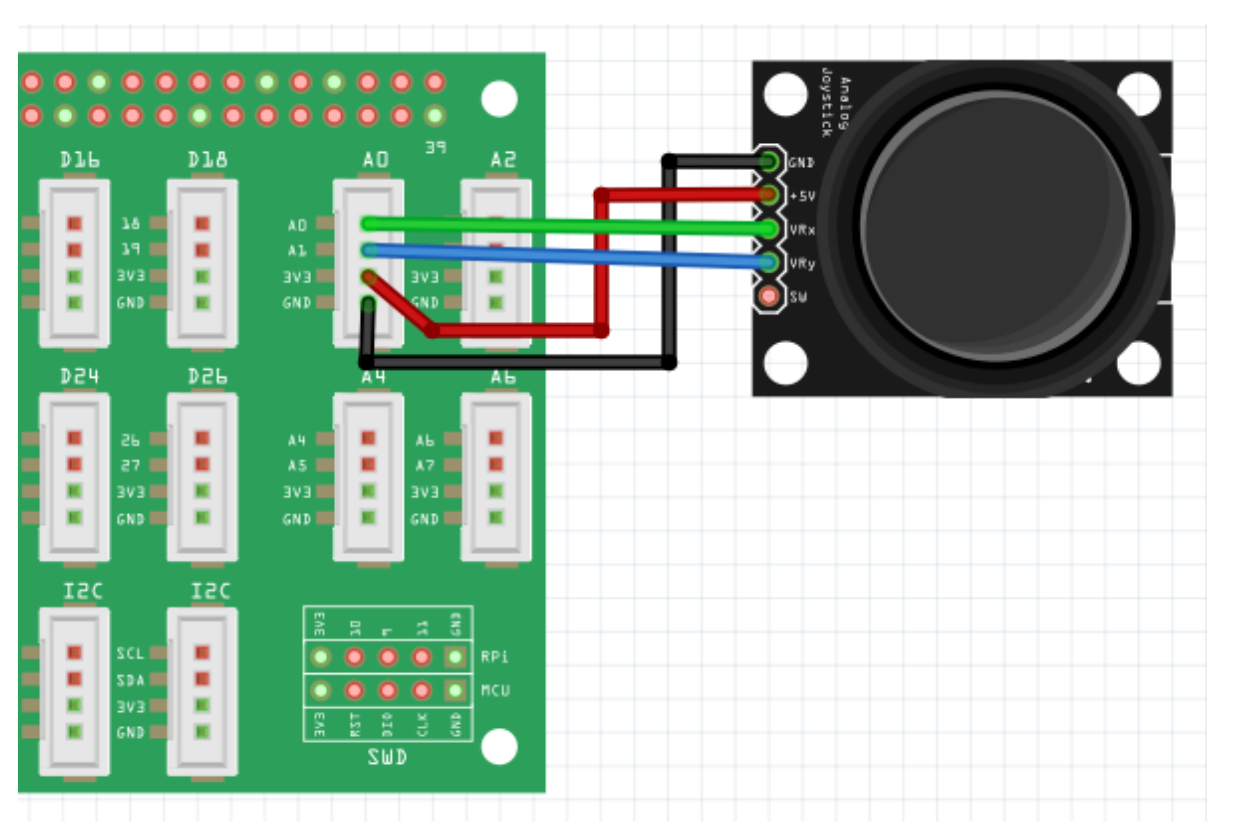
A joystick connected to channel A0 and A1 of a grove base hat. Note that the digital connection for the button press is not shown.#
For the button press, we will want to use one of the digital ports on the grove base hat:
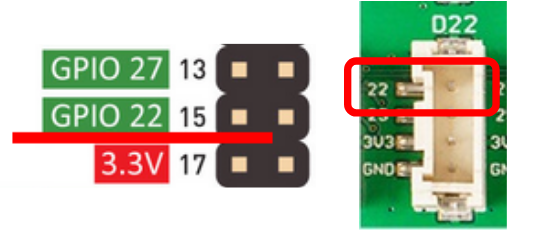
Left: the 6 digital ports. Right: a zoom-in on port D22, one of the possible ports you could use to read the button presses of the joystick. Take note of the number of the port you connect to the SW/SEL pin for the jopystick.#
Now that we have the system dependencies installed, and the cabling is correct, we can begin coding.
Lab code and environment#
We will continue using the coursework repository:
Make sure your coursework repository is up to date with upstream instructions branch (sync fork)
All of the work for this lab will take place in the lab-4 directory.
cd into the lab-4 directory and create a virtual environment for this lab.
Create a branch called lab-4 for the work you do in this lab.
activate the venv using source
.venv/bin/activateinstall the dependencies in
requirements.txtusingpip install -r requirements.txt
In this lab you will write and demo a program called joystick.py, using the libraries we
installed in requirements.txt
Requirements#
Your joystick.py program should use the following libraries:
grove.adcto read the analog voltage https://seeed-studio.github.io/grove.py/grove.adc.htmlgpiozeroto read the SEL/SW “button” on the joystick: https://gpiozero.readthedocs.io/en/stable/recipes.htmlsubprocessto give theydotoolcommands that move/click the mouse.
Your joystick.py file should include the following boilerplate:
from grove.adc import ADC
from gpiozero import Button
import subprocess
# Any constants/functions you define should go here

if __name__ == "__main__":
    # the code that uses your functions should go down here
Then, implement the following behavior:
The joystick moves the mouse of the graphical desktop session in the x and y directions.
The speed of the mouse depends on the voltage sent by the joystick.
There must be at least two speeds: slow and regular.
Eg.: the higher the banking angle of the joystick, the faster the mouse will move.
A click of the joystick SEL/SW triggers a left-click of the mouse
Troubleshooting#
If you’re having “EDGE DETECTION” issues, try installing the following programs on your reterminal:
sudo apt install swig liblgpio-dev build-essential
sudo apt install python3-lgpio
And make sure the following program is included in your requirements.txt:
lgpio
(you will need to run pip install -r requirements.txt again in your virtual environment)